[ 1st Edition ] [ Free Newsletter ]
[ Seminars ] [ Seminars on CD ROM ] [ Consulting ]
This chapter introduces the
important and yet non-traditional “patterns” approach to program
design.
Probably the most important step forward
in object-oriented design is the “design patterns” movement,
chronicled in Design
Patterns, by Gamma, Helm, Johnson & Vlissides (Addison-Wesley
1995).[67] That
book shows 23 different solutions to particular classes of problems. In this
chapter, the basic concepts of design patterns will be introduced along with
several examples. This should whet your appetite to read Design Patterns
(a source of what has now become an essential, almost mandatory, vocabulary for
OOP programmers).
The latter part of this chapter contains
an example of the design evolution process, starting with an initial solution
and moving through the logic and process of evolving the solution to more
appropriate designs. The program shown (a trash sorting simulation) has evolved
over time, and you can look at that evolution as a prototype for the way your
own design can start as an adequate solution to a particular problem and evolve
into a flexible approach to a class of
problems.
Initially, you can think of a pattern as
an especially clever and insightful way of solving a particular class of
problems. That is, it looks like a lot of people have worked out all the angles
of a problem and have come up with the most general, flexible solution for it.
The problem could be one you have seen and solved before, but your solution
probably didn’t have the kind of completeness you’ll see embodied in
a pattern.
Although they’re called
“design patterns,” they really aren’t tied to the realm of
design. A pattern seems to stand apart from the traditional way of thinking
about analysis, design, and implementation. Instead, a pattern embodies a
complete idea within a program, and thus it can sometimes appear at the analysis
phase or high-level design phase. This is interesting because a pattern has a
direct implementation in code and so you might not expect it to show up before
low-level design or implementation (and in fact you might not realize that you
need a particular pattern until you get to those phases).
The basic concept of a pattern can also
be seen as the basic concept of program design: adding a layer of
abstraction. Whenever you
abstract something you’re isolating particular details, and one of the
most compelling motivations behind this is to separate things that change
from things that stay the same. Another way to put this is that once you
find some part of your program that’s likely to change for one reason or
another, you’ll want to keep those changes from propagating other changes
throughout your code. Not only does this make the code much cheaper to maintain,
but it also turns out that it is usually simpler to understand (which results in
lowered costs).
Often, the most difficult part of
developing an elegant and cheap-to-maintain design is in discovering what I call
“the
vector
of change.” (Here, “vector” refers to the maximum gradient and
not a collection class.) This means finding the most important thing that
changes in your system, or put another way, discovering where your greatest cost
is. Once you discover the vector of change, you have the focal point around
which to structure your design.
So the goal of design patterns is to
isolate changes in your code. If you look at it this way, you’ve been
seeing some design patterns already in this book. For example,
inheritance can be thought of as a design pattern
(albeit one implemented by the compiler). It allows you to express differences
in behavior (that’s the thing that changes) in objects that all have the
same interface (that’s what stays the same).
Composition can also be considered a pattern, since it
allows you to change – dynamically or statically – the objects that
implement your class, and thus the way that class works.
You’ve also already seen another
pattern that appears in Design Patterns: the
iterator (Java 1.0 and
1.1 capriciously calls it the Enumeration; Java 2
collections use “iterator”). This hides the particular
implementation of the collection as you’re stepping through and selecting
the elements one by one. The iterator allows you to write generic code that
performs an operation on all of the elements in a sequence without regard to the
way that sequence is built. Thus your generic code can be used with any
collection that can produce an
iterator.
Possibly the simplest design pattern is
the singleton, which is a way to provide one and
only one instance of an object. This is used in the Java libraries, but
here’s a more direct example:
//: c16:SingletonPattern.java
// The Singleton design pattern: you can
// never instantiate more than one.

// Since this isn't inherited from a Cloneable
// base class and cloneability isn't added,
// making it final prevents cloneability from
// being added in any derived classes:
final class Singleton {
  private static Singleton s = new Singleton(47);
  private int i;
  private Singleton(int x) { i = x; }
  public static Singleton getHandle() {
    return s;
  }
  public int getValue() { return i; }
  public void setValue(int x) { i = x; }
}

public class SingletonPattern {
  public static void main(String[] args) {
    Singleton s = Singleton.getHandle();
    System.out.println(s.getValue());
    Singleton s2 = Singleton.getHandle();
    s2.setValue(9);
    System.out.println(s.getValue());
    try {
      // Can't do this: compile-time error.
      // Singleton s3 = (Singleton)s2.clone();
    } catch(Exception e) {}
  }
} ///:~
The key to creating a singleton is to
prevent the client programmer from having any way to create an object except the
ways you provide. You must make all
constructors private, and
you must create at least one constructor to prevent the compiler from
synthesizing a default
constructor for you (which it will create as
“friendly”).
At this point, you decide how
you’re going to create your object. Here, it’s created statically,
but you can also wait until the client programmer asks for one and create it on
demand. In any case, the object should be stored privately. You provide access
through public methods. Here, getHandle( ) produces the handle to
the Singleton object. The rest of the interface (getValue( )
and setValue( )) is the regular class interface.
Java also allows the creation of objects
through cloning. In this example, making the class final prevents
cloning. Since Singleton is inherited directly from Object, the
clone( ) method remains protected so it cannot be used (doing
so produces a compile-time error). However, if you’re inheriting from a
class hierarchy that has already overridden clone( ) as
public and implemented Cloneable, the way to prevent cloning is to
override clone( ) and throw a CloneNotSupportedException as
described in Chapter 12. (You could also override clone( ) and
simply return this, but that would be deceiving since the client
programmer would think they were cloning the object, but would instead still be
dealing with the original.)
Note that you aren’t restricted to
creating only one object. This is also a technique to create a limited pool of
objects. In that situation, however, you can be confronted with the problem of
sharing objects in the pool. If this is an issue, you can create a solution
involving a check-out and check-in of the shared
objects.
The Design Patterns book discusses
23 different patterns, classified under three purposes (all of which revolve
around the particular aspect that can vary). The three purposes
are:
The Design
Patterns book has a section on each of its 23 patterns along with one or
more examples for each, typically in C++ but sometimes in Smalltalk.
(You’ll find that this doesn’t matter too much since you can easily
translate the concepts from either language into Java.) This book will not
repeat all the patterns shown in Design Patterns since that book stands
on its own and should be studied separately. Instead, this chapter will give
some examples that should provide you with a decent feel for what patterns are
about and why they are so important.
After years of looking at these things,
it began to occur to me that the patterns themselves use basic principles of
organization, other than (and more fundamental than) those described in
Design Patterns. These principles are based on the structure of the
implementations, which is where I have seen great similarities between patterns
(more than those expressed in Design Patterns). Although we generally try
to avoid implementation in favor of interface, I have found that
it’s often easier to think about, and especially to learn about, the
patterns in terms of these structural principles. This chapter will attempt to
present the patterns based on their structure instead of the categories
presented in Design
Patterns.
An application framework allows you to
inherit from a class or set of classes and create a new application, reusing
most of the code in the existing classes and overriding one or more methods in
order to customize the application to your needs. A fundamental concept in the
application framework is the Template Method which is typically hidden
beneath the covers and drives the application by calling the various methods in
the base class (some of which you have overridden in order to create the
application).
For example, whenever you create an
applet you’re using an application framework: you inherit from
JApplet and then override init( ). The applet mechanism (which is
a Template Method) does the rest by drawing the screen, handling
the event loop, resizing, etc.
An important characteristic of the
Template Method is that it is defined in the base class and cannot be
changed. It’s sometimes a private method but it’s virtually
always final. It calls other base-class methods (the ones you override)
in order to do its job, but it is usually called only as part of an
initialization process (and thus the client programmer isn’t necessarily
able to call it directly).
//: c16:TemplateMethod.java
// Simple demonstration of Template Method

abstract class ApplicationFramework {
  public ApplicationFramework() {
    templateMethod();
  }
  abstract void customize1();
  abstract void customize2();
  // "private" means automatically "final":
  private void templateMethod() {
    for(int i = 0; i < 5; i++) {
      customize1();
      customize2();
    }
  }
}

// Create a new "application":
class MyApp extends ApplicationFramework {
  void customize1() {
    System.out.print("Hello ");
  }
  void customize2() {
    System.out.println("World!");
  }
}

public class TemplateMethod {
  public static void main(String args[]) {
    new MyApp();
  }
} ///:~
The base-class constructor is responsible
for performing the necessary initialization and then starting the
“engine” (the template method) that runs the application (in a GUI
application, this “engine” would be the main event loop). The client
programmer simply provides definitions for customize1( ) and
customize2( ) and the “application” is ready to
run.
Both Proxy and Bridge
provide a surrogate class that you use in your code; the real class that does
the work is hidden behind this surrogate class. When you call a method in the
surrogate, it simply turns around and calls the method in the implementing
class. These two patterns are so similar that the Proxy is simply a
special case of Bridge. One is tempted to just lump the two together into
a pattern called Surrogate, but the term “proxy” has a
long-standing and specialized meaning, which probably explains the reason for
the two different patterns.
The basic idea is simple: from a base
class, the surrogate is derived along with the class or classes that provide the
actual implementation:
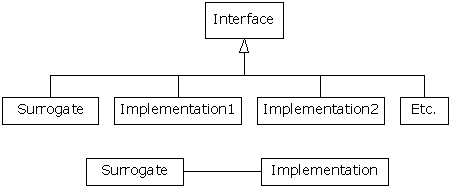
When a surrogate object is created, it is
given an implementation to which to send all of the method
calls.
Structurally, the difference between
Proxy and Bridge is simple: a Proxy has only one
implementation, while Bridge has more than one. The application of the
patterns is considered (in Design Patterns) to be distinct: Proxy
is used to control access to its implementation, while Bridge allows you
to change the implementation dynamically. However, if you expand your notion of
“controlling access to implementation” then the two fit neatly
together.
If we implement Proxy by following
the above diagram, it looks like this:
//: c16:ProxyDemo.java
// Simple demonstration of the Proxy pattern

interface ProxyBase {
  void f();
  void g();
  void h();
}

class Proxy implements ProxyBase {
  private ProxyBase implementation;
  public Proxy() {
    implementation = new Implementation();
  }
  // Pass method calls to the implementation:
  public void f() { implementation.f(); }
  public void g() { implementation.g(); }
  public void h() { implementation.h(); }
}

class Implementation implements ProxyBase {
  public void f() {
    System.out.println("Implementation.f()");
  }
  public void g() {
    System.out.println("Implementation.g()");
  }
  public void h() {
    System.out.println("Implementation.h()");
  }
}

public class ProxyDemo {
  public static void main(String args[]) {
    Proxy p = new Proxy();
    p.f();
    p.g();
    p.h();
  }
} ///:~
Of course, it isn’t necessary that
Implementation have the same interface as Proxy; as long as
Proxy is somehow “speaking for” the class that it is
referring method calls to then the basic idea is satisfied. However, it is
convenient to have a common interface so that Implementation is forced to
fulfill all the methods that Proxy needs to
call.
The State pattern adds more
implementations to Proxy, along with a way to switch from one
implementation to another during the lifetime of the surrogate:
//: c16:StateDemo.java
// Simple demonstration of the State pattern

interface StateBase {
  void f();
  void g();
  void h();
  void changeImp(StateBase newImp);
}

class State implements StateBase {
  private StateBase implementation;
  public State(StateBase imp) {
    implementation = imp;
  }
  public void changeImp(StateBase newImp) {
    implementation = newImp;
  }
  // Pass method calls to the implementation:
  public void f() { implementation.f(); }
  public void g() { implementation.g(); }
  public void h() { implementation.h(); }
}

class Implementation1 implements StateBase {
  public void f() {
    System.out.println("Implementation1.f()");
  }
  public void g() {
    System.out.println("Implementation1.g()");
  }
  public void h() {
    System.out.println("Implementation1.h()");
  }
  public void changeImp(StateBase newImp) {}
}

class Implementation2 implements StateBase {
  public void f() {
    System.out.println("Implementation2.f()");
  }
  public void g() {
    System.out.println("Implementation2.g()");
  }
  public void h() {
    System.out.println("Implementation2.h()");
  }
  public void changeImp(StateBase newImp) {}
}

public class StateDemo {
  static void test(StateBase b) {
    b.f();
    b.g();
    b.h();
  }
  public static void main(String args[]) {
    StateBase b =
      new State(new Implementation1());
    test(b);
    b.changeImp(new Implementation2());
    test(b);
  }
} ///:~
In main( ), you can see that the
first implementation is used for a bit, then the second implementation is
swapped in and that is used.
The difference between Proxy and
State is in the problems that are solved. The common uses for
Proxy as described in Design Patterns are:
You could look at a
Java handle as a kind of protection proxy, since it controls access to the
actual object on the heap (and ensures, for example, that you don’t use a
Null handle).
[[ Rewrite this: In Design
Patterns, Proxy and Bridge are not seen as related to each
other because the two are given (what I consider arbitrarily) different
structures. Bridge, in particular, uses a separate implementation
hierarchy but this seems to me to be unnecessary unless you have decided that
the implementation is not under your control (certainly a possibility, but if
you own all the code there seems to be no reason not to benefit from the
elegance and helpfulness of the single base class). In addition, Proxy
need not use the same base class for its implementation, as long as the proxy
object is controlling access to the object it “fronting” for.
Regardless of the specifics, in both Proxy and Bridge a surrogate
is passing method calls through to an implementation object.]]]
Exercises
While Bridge has a way to allow
the client programmer to change the implementation, StateMachine imposes
a structure to automatically change the implementation from one object to the
next. The current implementation represents the state that a system is in, and
the system behaves differently from one state to the next (because it uses
Bridge). Basically, this is a “state machine” using
objects.
The code that moves the system from one
state to the next is often a Template Method, as seen in this
example:
//: c16:StateMachineDemo.java
// Demonstrates StateMachine pattern & Template method
import java.util.*;

interface State {
  void run();
}

abstract class StateMachine {
  protected State currentState;
  abstract protected boolean changeState();
  // Template method:
  protected final void runAll() {
    while(changeState()) // Customizable
      currentState.run();
  }
}

// A different subclass for each state:

class Wash implements State {
  public void run() {
    System.out.println("Washing");
    try {
      Thread.sleep(500);
    } catch(InterruptedException e) {}
  }
}

class Spin implements State {
  public void run() {
    System.out.println("Spinning");
    try {
      Thread.sleep(500);
    } catch(InterruptedException e) {}
  }
}

class Rinse implements State {
  public void run() {
    System.out.println("Rinsing");
    try {
      Thread.sleep(500);
    } catch(InterruptedException e) {}
  }
}

class Washer extends StateMachine {
  private int i = 0;
  // The state table:
  private State states[] = {
    new Wash(), new Spin(),
    new Rinse(), new Spin(),
  };
  public Washer() { runAll(); }
  public boolean changeState() {
    if(i < states.length) {
      // Change the state by setting the
      // surrogate handle to a new object:
      currentState = states[i++];
      return true;
    } else
      return false;
  }
}

public class StateMachineDemo {
  public static void main(String args[]) {
    new Washer();
  }
} ///:~
Here, the class that controls the states
(StateMachine in this case) is responsible for deciding the next state to
move to. However, the state objects themselves may also decide what state to
move to next, typically based on some kind of input to the system. This is the
more flexible solution.
Exercises
When you discover that you need to add
new types to a system, the most sensible first step is to use polymorphism to
create a common interface to those new types. This separates the rest of the
code in your system from the knowledge of the specific types that you are
adding. New types may be added without disturbing exising code ... or so it
seems. At first it would appear that the only place you need to change the code
in such a design is the place where you inherit a new type, but this is not
quite true. You must still create an object of your new type, and at the point
of creation you must specify the exact constructor to use. Thus, if the code
that creates objects is distributed throughout your application, you have the
same problem when adding new types – you must still chase down all the
points of your code where type matters. It happens to be the creation of
the type that matters in this case rather than the use of the type (which
is taken care of by polymorphism), but the effect is the same: adding a new type
can cause problems.
The solution is to force the creation of
objects to occur through a common factory rather than to allow the
creational code to be spread throughout your system. If all the code in your
program must go through this factory whenever it needs to create one of your
objects, then all you must do when you add a new object is to modify the
factory.
Since every object-oriented program
creates objects, and since it’s very likely you will extend your program
by adding new types, I suspect that factories may be the most universally useful
kinds of design patterns.
As an example, let’s revisit the
Shape system. One approach is to make the factory a static method
of the base class:
//: c16:ShapeFactory1.java
// A simple static factory method
import java.util.*;

class BadShapeCreation extends Exception {
  BadShapeCreation(String msg) {
    super(msg);
  }
}

abstract class Shape {
  public abstract void draw();
  public abstract void erase();
  static Shape factory(String type)
    throws BadShapeCreation {
    if(type == "Circle") return new Circle();
    if(type == "Square") return new Square();
    throw new BadShapeCreation(type);
  }
}

class Circle extends Shape {
  Circle() {} // Friendly constructor
  public void draw() {
    System.out.println("Circle.draw");
  }
  public void erase() {
    System.out.println("Circle.erase");
  }
}

class Square extends Shape {
  Square() {} // Friendly constructor
  public void draw() {
    System.out.println("Square.draw");
  }
  public void erase() {
    System.out.println("Square.erase");
  }
}

public class ShapeFactory1 {
  public static void main(String args[]) {
    String shlist[] = { "Circle", "Square",
      "Square", "Circle", "Circle", "Square" };
    ArrayList shapes = new ArrayList();
    try {
      for(int i = 0; i < shlist.length; i++)
        shapes.add(Shape.factory(shlist[i]));
    } catch(BadShapeCreation e) {
      e.printStackTrace();
      return;
    }
    Iterator i = shapes.iterator();
    while(i.hasNext()) {
      Shape s = (Shape)i.next();
      s.draw();
      s.erase();
    }
  }
} ///:~
The factory( ) takes an
argument that allows it to determine what type of Shape to create; it
happens to be a String in this case but it could be any set of data. The
factory( ) is now the only other code in the system that needs to be
changed when a new type of Shape is added (the initialization data for
the objects will presumably come from somewhere outside the system, and not be a
hard-coded array as in the above example).
To encourage creation to only happen in
the factory( ), the constructors for the specific types of
Shape are made “friendly,” so factory( ) has
access to the constructors but they are not available outside the
package.
The static factory( ) method
in the previous example forces all the creation operations to be focused in one
spot, to that’s the only place you need to change the code. This is
certainly a reasonable solution, as it throws a box around the process of
creating objects. However, the Design Patterns book emphasizes that the
reason for the Factory Method pattern is so that different types of
factories can be subclassed from the basic factory (the above design is
mentioned as a special case). However, the book does not provide an example, but
instead just repeats the example used for the Abstract Factory
(you’ll see an example of this in the next section). Here is
ShapeFactory1.java modified so the factory methods are in a separate
class as virtual functions. Notice also that the specific Shape classes
are dynamically loaded on demmand:
//: c16:ShapeFactory2.java
// Polymorphic factory methods
import java.util.*;

class BadShapeCreation extends Exception {
  BadShapeCreation(String msg) {
    super(msg);
  }
}

interface Shape {
  void draw();
  void erase();
}

abstract class ShapeFactory {
  protected abstract Shape create();
  static Map factories = new HashMap();
  static Shape createShape(String id)
  throws BadShapeCreation {
    if(!factories.containsKey(id)) {
      try {
        Class.forName(id); // Load dynamically
      } catch(ClassNotFoundException e) {
        throw new BadShapeCreation(id);
      }
      // See if it was put in:
      if(!factories.containsKey(id))
        throw new BadShapeCreation(id);
    }
    return
      ((ShapeFactory)factories.get(id)).create();
  }
}

class Circle implements Shape {
  private Circle() {}
  public void draw() {
    System.out.println("Circle.draw");
  }
  public void erase() {
    System.out.println("Circle.erase");
  }
  static class Factory extends ShapeFactory {
    protected Shape create() {
      return new Circle();
    }
  }
  static {
    ShapeFactory.factories.put(
      "Circle", new Circle.Factory());
  }
}

class Square implements Shape {
  private Square() {}
  public void draw() {
    System.out.println("Square.draw");
  }
  public void erase() {
    System.out.println("Square.erase");
  }
  static class Factory extends ShapeFactory {
    protected Shape create() {
      return new Square();
    }
  }
  static {
    ShapeFactory.factories.put(
      "Square", new Square.Factory());
  }
}

public class ShapeFactory2 {
  public static void main(String args[]) {
    String shlist[] = { "Circle", "Square",
      "Square", "Circle", "Circle", "Square" };
    ArrayList shapes = new ArrayList();
    try {
      for(int i = 0; i < shlist.length; i++)
        shapes.add(
          ShapeFactory.createShape(shlist[i]));
    } catch(BadShapeCreation e) {
      e.printStackTrace();
      return;
    }
    Iterator i = shapes.iterator();
    while(i.hasNext()) {
      Shape s = (Shape)i.next();
      s.draw();
      s.erase();
    }
  }
} ///:~
Now the factory method appears in its own
class, ShapeFactory, as the create( ) method. This is a
protected method which means it cannot be called directly, but it can be
overridden. The subclasses of Shape must each create their own subclasses
of ShapeFactory and override the create( ) method to create
an object of their own type. The actual creation of shapes is performed by
calling ShapeFactory.createShape( ), which is a static method that
uses the Map in ShapeFactory to find the appropriate factory
object based on an identifier that you pass it. The factory is immediately used
to create the shape object, but you could imagine a more complex problem where
the appropriate factory object is returned and then used by the caller to create
an object in a more sophisticated way. However, it seems that much of the time
you don’t need the intricacies of the polymorphic factory method, and a
single static method in the base class (as shown in ShapeFactory1.java)
will work fine.
Notice that the ShapeFactory must
be initialized by loading its Map with factory objects, which takes place
in the static initialization clause of each of the Shape implementations.
So to add a new type to this design you must inherit the type, create a factory,
and add the static initialization clause to load the Map. This extra
complexity again suggests the use of a static factory method if you
don’t need to create individual factory
objects.
The Abstract Factory pattern looks
like the factory objects we’ve seen previously, with not one but several
factory methods. Each of the factory methods creates a different kind of object.
The idea is that at the point of creation of the factory object, you decide how
all the objects created by that factory will be used. The example given in
Design Patterns implements portability across various graphical user
interfaces (GUIs): you create a factory object appropriate to the GUI that
you’re working with, and from then on when you ask it for a menu, button,
slider, etc. it will automatically create the appropriate version of that item
for the GUI. Thus you’re able to isolate, in one place, the effect of
changing from one GUI to another.
As another example suppose you are
creating a general-purpose gaming environment and you want to be able to support
different types of games. Here’s how it might look using an abstract
factory:
//: c16:GameEnvironment.java
// An example of the Abstract Factory pattern

interface Obstacle {
  void action();
}

interface Player {
  void interactWith(Obstacle o);
}

class Kitty implements Player {
  public void interactWith(Obstacle ob) {
    System.out.print("Kitty has encountered a ");
    ob.action();
  }
}

class KungFuGuy implements Player {
  public void interactWith(Obstacle ob) {
    System.out.print("KungFuGuy now battles a ");
    ob.action();
  }
}

class Puzzle implements Obstacle {
  public void action() {
    System.out.println("Puzzle");
  }
}

class NastyWeapon implements Obstacle {
  public void action() {
    System.out.println("NastyWeapon");
  }
}

// The Abstract Factory:
interface GameElementFactory {
  Player makePlayer();
  Obstacle makeObstacle();
}

// Concrete factories:
class KittiesAndPuzzles
implements GameElementFactory {
  public Player makePlayer() {
    return new Kitty();
  }
  public Obstacle makeObstacle() {
    return new Puzzle();
  }
}

class KillAndDismember
implements GameElementFactory {
  public Player makePlayer() {
    return new KungFuGuy();
  }
  public Obstacle makeObstacle() {
    return new NastyWeapon();
  }
}

public class GameEnvironment {
  private GameElementFactory gef;
  private Player p;
  private Obstacle ob;
  public GameEnvironment(
    GameElementFactory factory) {
    gef = factory;
    p = factory.makePlayer();
    ob = factory.makeObstacle();
  }
  public void play() {
    p.interactWith(ob);
  }
  public static void main(String args[]) {
    GameElementFactory
      kp = new KittiesAndPuzzles(),
      kd = new KillAndDismember();
    GameEnvironment
      g1 = new GameEnvironment(kp),
      g2 = new GameEnvironment(kd);
    g1.play();
    g2.play();
  }
} ///:~
In this environment, Player
objects interact with Obstacle objects, but there are different types of
players and obstacles depending on what kind of game you’re playing. You
determine the kind of game by choosing a particular GameElementFactory,
and then the GameEnvironment controls the setup and play of the game. In
this example, the setup and play is very simple, but those activities (the
initial conditions and the state change) can determine much of the
game’s outcome. Here, GameEnvironment is not designed to be
inherited, although it could very possibly make sense to do
that.
This also contains examples of Double
Dispatching and the Factory Method, both of which will be explained
later.
In Advanced C++ (get full
citation), Jim Coplien coins the term “functor” which is an
object whose sole purpose is to encapsulate a function. The point is to decouple
the choice of function to be called from the site where that function is called.
This term is mentioned but not used in
Design Patterns. However, the theme of the functor is repeated in a
number of patterns in that book.
This is the functor in its purest sense:
a method that’s an
object[68]. By
wrapping a method in an object, you can pass it to other methods or objects as a
parameter, to tell them to perform this particular operation in the process of
fulfilling your request.
//: c16:CommandPattern.java
import java.util.*;

interface Command {
  void execute();
}

class Hello implements Command {
  public void execute() {
    System.out.print("Hello ");
  }
}

class World implements Command {
  public void execute() {
    System.out.print("World! ");
  }
}

class IAm implements Command {
  public void execute() {
    System.out.print("I'm the command pattern!");
  }
}

// A Command object that holds commands:
class Macro implements Command {
  private ArrayList commands = new ArrayList();
  public void add(Command c) { commands.add(c); }
  public void execute() {
    Iterator it = commands.iterator();
    while(it.hasNext())
      ((Command)it.next()).execute();
  }
}

public class CommandPattern {
  public static void main(String args[]) {
    Macro macro = new Macro();
    macro.add(new Hello());
    macro.add(new World());
    macro.add(new IAm());
    macro.execute();
  }
} ///:~
The primary point of Command is to
allow you to hand a desired action to a method or object. In the above example,
this provides a way to queue a set of actions to be performed collectively. In
this case, it allows you to dynamically create new behavior, something you can
normally only do by writing new code but in the above example could be done by
interpreting a script (see the Interpreter pattern if what you need to do
gets very complex).
Another example of Command is
c10:DirList.java. The DirFilter class is the command object which
contans its action in the method accept( ) that is passed to the list(
) method. The list( ) method determines what to include in its resut
by calling accept( ).
Design Patterns says that
“Commands are an object-oriented replacement for
callbacks[69].”
However, I think that the word “back” is an essental part of the
concept of callbacks. That is, I think a callback actually reaches back to the
creator of the callback. On the other hand, with a Command object you
typically just create it and hand it to some method or object, and are not
otherwise connected over time to the Command object. That’s my take
on it, anyway. Later in this chapter, I combine a group of design patterns under
the heading of
“callbacks.”
Strategy appears to be a family of
Command classes, all inherited from the same base. But if you look at
Command, you’ll see that it has the same structure: a hierarchy of
functors. The difference is in the way this hierarchy is used. As seen in
c10:DirList.java, you use Command to solve a particular problem
– in that case, selecting files from a list. The “thing that stays
the same” is the body of the method that’s being called, and the
part that varies is isolated in the functor. I would hazard to say that
Command provides flexibility while you’re writing the program,
whereas Strategy’s flexibility is at run-time. Nonetheless, it
seems a rather fragile distinction.
Strategy also adds a
“Context” which can be a surrogate class that controls the selection
and use of the particular strategy object – just like Bridge!
Here’s what it looks like:
//: c16:StrategyPattern.java

// The strategy interface:
interface FindMinima {
  // Line is a sequence of points:
  double[] algorithm(double[] line);
}

// The various strategies:
class LeastSquares implements FindMinima {
  public double[] algorithm(double[] line) {
    return new double[] { 1.1, 2.2 }; // Dummy
  }
}

class Perturbation implements FindMinima {
  public double[] algorithm(double[] line) {
    return new double[] { 3.3, 4.4 }; // Dummy
  }
}

class Bisection implements FindMinima {
  public double[] algorithm(double[] line) {
    return new double[] { 5.5, 6.6 }; // Dummy
  }
}

// The "Context" controls the strategy:
class MinimaSolver {
  private FindMinima strategy;
  public MinimaSolver(FindMinima strat) {
    strategy = strat;
  }
  double[] minima(double[] line) {
    return strategy.algorithm(line);
  }
  void changeAlgorithm(FindMinima newAlgorithm) {
    strategy = newAlgorithm;
  }
}

public class StrategyPattern {
  public static void printArray(double[] array) {
    for(int i = 0; i < array.length; i++) {
      System.out.print(array[i]);
      if(i != array.length -1)
        System.out.print(", ");
    }
    System.out.println();
  }
  public static void main(String args[]) {
    MinimaSolver solver =
      new MinimaSolver(new LeastSquares());
    double[] line = {
      1.0, 2.0, 1.0, 2.0, -1.0,
      3.0, 4.0, 5.0, 4.0 };
    printArray(solver.minima(line));
    solver.changeAlgorithm(new Bisection());
    printArray(solver.minima(line));
  }
} ///:~
Chain of Responsibility might be
thought of as a dynamic generalization of recursion using Strategy
objects. You make a call, and each Strategy in a linked sequence
tries to satisfy the call. The process ends when one of the strategies is
successful or the chain ends. In recursion, one method calls itself over and
over until a termination condition is reached; with Chain of
Responsibility, a method calls the same base-class method (with different
implementations) which calls another implementation of the base-class method,
etc., until a termination condition is reached.
Instead of calling a single method to
satisfy a request, multiple methods in the chain have a chance to satisfy the
request, so it has the flavor of an expert system. Since the chain is
effectively a linked list, it can be dynamically created, so you could also
think of it as a more general, dynamically-built switch
statement.
In StrategyPattern.java, above,
what you probably want is to automatically find a solution. Chain of
Responsibility provides a way to do this:
//: c16:ChainOfResponsibility.java

class FindMinima {
  private FindMinima successor = null;
  public void add(FindMinima succ) {
    FindMinima end = this;
    while(end.successor != null)
      end = end.successor; // Traverse list
    end.successor = succ;
  }
  public double[] algorithm(double[] line) {
    if(successor != null)
      return successor.algorithm(line);
    else // Try the next one in the chain:
      return new double[] {};
  }
}

class LeastSquares extends FindMinima {
  public double[] algorithm(double[] line) {
    System.out.println("LeastSquares.algorithm");
    boolean weSucceed = false;
    if(weSucceed) // Actual test/calculation here
      return new double[] { 1.1, 2.2 }; // Dummy
    else // Try the next one in the chain:
      return super.algorithm(line);
  }
}

class Perturbation extends FindMinima {
  public double[] algorithm(double[] line) {
    System.out.println("Perturbation.algorithm");
    boolean weSucceed = false;
    if(weSucceed) // Actual test/calculation here
      return new double[] { 3.3, 4.4 }; // Dummy
    else // Try the next one in the chain:
      return super.algorithm(line);
  }
}

class Bisection extends FindMinima {
  public double[] algorithm(double[] line) {
    System.out.println("Bisection.algorithm");
    boolean weSucceed = true;
    if(weSucceed) // Actual test/calculation here
      return new double[] { 5.5, 6.6 }; // Dummy
    else
      return super.algorithm(line);
  }
}

// The "Handler" proxies to the first functor:
class MinimaSolver {
  private FindMinima chain = new FindMinima();
  void add(FindMinima newAlgorithm) {
    chain.add(newAlgorithm);
  }
  // Make the call to the top of the chain:
  double[] minima(double[] line) {
    return chain.algorithm(line);
  }
}

public class ChainOfResponsibility {
  public static void printArray(double[] array) {
    for(int i = 0; i < array.length; i++) {
      System.out.print(array[i]);
      if(i != array.length -1)
        System.out.print(", ");
    }
    System.out.println();
  }
  public static void main(String args[]) {
    MinimaSolver solver = new MinimaSolver();
    solver.add(new LeastSquares());
    solver.add(new Perturbation());
    solver.add(new Bisection());
    double[] line = {
      1.0, 2.0, 1.0, 2.0, -1.0,
      3.0, 4.0, 5.0, 4.0 };
    printArray(solver.minima(line));
  }
} ///:~Sometimes the problem that you’re
solving is as simple as “I don’t have the interface that I
want.” Two of the patterns in Design Patterns solve this problem:
Adapter takes one type and produces an interface to some other type.
Façade creates an interface to a set of classes, simply to provide
a more comfortable way to deal with a library or bundle of
resources.
When you’ve got this, and
you need that, Adapter solves the problem. The only requirement is
to produce a that, and there are a number of ways you can accomplish this
adaptation.
//: c16:Adapter.java
// Variations on the Adapter pattern

class WhatIHave {
  public void g() {}
  public void h() {}
}

interface WhatIWant {
  void f();
}

class ProxyAdapter implements WhatIWant {
  WhatIHave whatIHave;
  public ProxyAdapter(WhatIHave wih) {
    whatIHave = wih;
  }
  public void f() {
    // Implement behavior using
    // methods in WhatIHave:
    whatIHave.g();
    whatIHave.h();
  }
}

class WhatIUse {
  public void op(WhatIWant wiw) {
    wiw.f();
  }
}

// Approach 2: build adapter use into op():
class WhatIUse2 extends WhatIUse {
  public void op(WhatIHave wih) {
    new ProxyAdapter(wih).f();
  }
}

// Approach 3: build adapter into WhatIHave:
class WhatIHave2 extends WhatIHave
implements WhatIWant {
  public void f() {
    g();
    h();
  }
}

// Approach 4: use an inner class:
class WhatIHave3 extends WhatIHave {
  private class InnerAdapter implements WhatIWant{
    public void f() {
      g();
      h();
    }
  }
  public WhatIWant whatIWant() {
    return new InnerAdapter();
  }
}

public class Adapter {
  public static void main(String args[]) {
    WhatIUse whatIUse = new WhatIUse();
    WhatIHave whatIHave = new WhatIHave();
    WhatIWant adapt= new ProxyAdapter(whatIHave);
    whatIUse.op(adapt);
    // Approach 2:
    WhatIUse2 whatIUse2 = new WhatIUse2();
    whatIUse2.op(whatIHave);
    // Approach 3:
    WhatIHave2 whatIHave2 = new WhatIHave2();
    whatIUse.op(whatIHave2);
    // Approach 4:
    WhatIHave3 whatIHave3 = new WhatIHave3();
    whatIUse.op(whatIHave3.whatIWant());
  }
} ///:~
I’m taking liberties with the term
“proxy” here, because in Design Patterns they assert that a
proxy must have an identical interface with the object that it is a surrogate
for. However, if you have the two words together: “proxy adapter,”
it is perhaps more reasonable.
A general principle that I apply when
I’m casting about trying to mold requirements into a first-cut object is
“If something is ugly, hide it inside an object.” This is basically
what Façade accomplishes. If you have a rather confusing
collection of classes and interactions that the client programmer doesn’t
really need to see, then you can create an interface that is useful for the
client programmer and that only presents what’s
necessary.
Façade is often a implemented as
singleton abstract factory. Of course, you can easily get this effect by
creating a class containing static factory methods:
//: c16:Facade.java

class A { public A(int x) {} }
class B { public B(long x) {} }
class C { public C(double x) {} }

// Other classes that aren't exposed by the
// facade go here ...

public class Facade {
  static A makeA(int x) { return new A(x); }
  static B makeB(long x) { return new B(x); }
  static C makeC(double x) { return new C(x); }
  public static void main(String args[]) {
    // The client programmer gets the objects
    // by calling the static methods:
    A a = Facade.makeA(1);
    B b = Facade.makeB(1);
    C c = Facade.makeC(1.0);
  }
} ///:~
The example given in Design
Patterns isn’t really a Façade but just a class that
uses the other classes.
To me, the Façade has a
rather “procedural” (non-object-oriented) feel to it: you are just
calling some functions to give you objects. And how different is it, really,
from Abstract Factory? The point of Façade is to hide part
of a library of classes (and their interactions) from the client programmer, to
make the interface to that group of classes more digestible and easier to
understand.
However, this is precisely what the
packaging features in Java accomplish: outside of the library, you can only
create and use public classes; all the non-public classes are only
accessible within the package. It’s as if Façade is a
built-in feature of Java.
To be fair, Design Patterns is
written primarily for a C++ audience. Although C++ has namespaces to prevent
clashes of globals and class names, this does not provide the class hiding
mechanism that you get with non-public classes in Java. The majority of
the time I think that Java packages will solve the Façade
problem.
If the application user needs greater
run-time flexibility, for example to create scripts describing the desired
behavior of the system, you can use the Interpreter design pattern. Here,
you create and embed a language interpreter into your program.
Developing your own language and building
an interpreter for it is a time-consuming distraction from the process of
building your application. The best solution is to reuse code: that is, to embed
an interpreter that’s already been built and debugged for you. The Python
language can be freely embedded in your for-profit application without any
license agreement, royalties, or strings of any kind. In addition, there is a
version of Python called JPython which is entirely Java byte codes, so
incorporating it into your application is quite simple. Python is a scripting
language that is very easy to learn, very logical to read and write, supports
functions and objects, has a large set of available libraries, and runs on
virtually every platform. You can download Python and learn more about it by
going to http://www.Python.org.
Decoupling code behavior
Observer, and a category of
callbacks called “multiple dispatching (not in Design
Patterns)” including the Visitor from Design
Patterns.
Like the other forms of callback, this
contains a hook point where you can change code. The difference is in the
observer’s completely dynamic nature. It is often used for the specific
case of changes based on other object’s change of state, but is also the
basis of event management. Anytime you want to decouple the source of the call
from the called code in a completely dynamic way.
The
observer pattern solves a fairly
common problem: What if a group of objects needs to update themselves when some
object changes state? This can be seen in the “model-view” aspect of
Smalltalk’s MVC (model-view-controller), or the almost-equivalent
“Document-View Architecture.” Suppose that you have some data (the
“document”) and more than one view, say a plot and a textual view.
When you change the data, the two views must know to update themselves, and
that’s what the observer facilitates. It’s a common enough problem
that its solution has been made a part of the standard java.util
library.
There are two types of objects used to
implement the observer pattern in Java. The
Observable class keeps track of everybody who
wants to be informed when a change happens, whether the “state” has
changed or not. When someone says “OK, everybody should check and
potentially update themselves,” the Observable class performs this
task by calling the notifyObservers( )
method for each one on the list. The notifyObservers( ) method is
part of the base class Observable.
There are actually two “things that
change” in the observer pattern: the quantity of observing objects and the
way an update occurs. That is, the observer pattern allows you to modify both of
these without affecting the surrounding code.
-------------
Observer is an
“interface” class that only has one member function,
update( ). This function is called by the object that’s being
observed, when that object decides its time to update all its observers. The
arguments are optional; you could have an update( ) with no
arguments and that would still fit the observer pattern; however this is more
general – it allows the observed object to pass the object that caused the
update (since an Observer may be registered with more than one observed
object) and any extra information if that’s helpful, rather than forcing
the Observer object to hunt around to see who is updating and to fetch
any other information it needs.
The “observed object” that
decides when and how to do the updating will be called the
Observable.
Observable has a flag to indicate
whether it’s been changed. In a simpler design, there would be no flag; if
something happened, everyone would be notified. The flag allows you to wait, and
only notify the Observers when you decide the time is right. Notice,
however, that the control of the flag’s state is protected, so that
only an inheritor can decide what constitutes a change, and not the end user of
the resulting derived Observer class.
Most of the work is done in
notifyObservers( ). If the changed flag has not been set,
this does nothing. Otherwise, it first clears the changed flag so
repeated calls to notifyObservers( ) won’t waste time. This is
done before notifying the observers in case the calls to update( )
do anything that causes a change back to this Observable object. Then it
moves through the set and calls back to the update( ) member
function of each Observer.
At first it may appear that you can use
an ordinary Observable object to manage the updates. But this
doesn’t work; to get an effect, you must inherit from
Observable and somewhere in your derived-class code call
setChanged( ). This is the member function
that sets the “changed” flag, which means that when you call
notifyObservers( ) all of the observers
will, in fact, get notified. Where you call setChanged( )
depends on the logic of your program.
Here is an example of the observer
pattern:
//: c16:ObservedFlower.java
// Demonstration of "observer" pattern
import java.util.*;

class Flower {
  private boolean isOpen;
  private OpenNotifier oNotify =
    new OpenNotifier();
  private CloseNotifier cNotify =
    new CloseNotifier();
  public Flower() { isOpen = false; }
  public void open() { // Opens its petals
    isOpen = true;
    oNotify.notifyObservers();
    cNotify.open();
  }
  public void close() { // Closes its petals
    isOpen = false;
    cNotify.notifyObservers();
    oNotify.close();
  }
  public Observable opening() {
    return oNotify;
  }
  public Observable closing() {
    return cNotify;
  }
  private class OpenNotifier extends Observable {
    private boolean alreadyOpen = false;
    public void notifyObservers() {
      if(isOpen && !alreadyOpen) {
        setChanged();
        super.notifyObservers();
        alreadyOpen = true;
      }
    }
    public void close() { alreadyOpen = false; }
  }
  private class CloseNotifier extends Observable{
    private boolean alreadyClosed = false;
    public void notifyObservers() {
      if(!isOpen && !alreadyClosed) {
        setChanged();
        super.notifyObservers();
        alreadyClosed = true;
      }
    }
    public void open() { alreadyClosed = false; }
  }
}

class Bee {
  private String name;
  private OpenObserver openObsrv =
    new OpenObserver();
  private CloseObserver closeObsrv =
    new CloseObserver();
  public Bee(String nm)  { name = nm; }
  // An inner class for observing openings:
  private class OpenObserver implements Observer{
    public void update(Observable ob, Object a) {
      System.out.println("Bee " + name
        + "'s breakfast time!");
    }
  }
  // Another inner class for closings:
  private class CloseObserver implements Observer{
    public void update(Observable ob, Object a) {
      System.out.println("Bee " + name
        + "'s bed time!");
    }
  }
  public Observer openObserver() {
    return openObsrv;
  }
  public Observer closeObserver() {
    return closeObsrv;
  }
}

class Hummingbird {
  private String name;
  private OpenObserver openObsrv =
    new OpenObserver();
  private CloseObserver closeObsrv =
    new CloseObserver();
  public Hummingbird(String nm) { name = nm; }
  private class OpenObserver implements Observer{
    public void update(Observable ob, Object a) {
      System.out.println("Hummingbird " + name
        + "'s breakfast time!");
    }
  }
  private class CloseObserver implements Observer{
    public void update(Observable ob, Object a) {
      System.out.println("Hummingbird " + name
        + "'s bed time!");
    }
  }
  public Observer openObserver() {
    return openObsrv;
  }
  public Observer closeObserver() {
    return closeObsrv;
  }
}

public class ObservedFlower {
  public static void main(String args[]) {
    Flower f = new Flower();
    Bee
      ba = new Bee("A"),
      bb = new Bee("B");
    Hummingbird
      ha = new Hummingbird("A"),
      hb = new Hummingbird("B");
    f.opening().addObserver(ha.openObserver());
    f.opening().addObserver(hb.openObserver());
    f.opening().addObserver(ba.openObserver());
    f.opening().addObserver(bb.openObserver());
    f.closing().addObserver(ha.closeObserver());
    f.closing().addObserver(hb.closeObserver());
    f.closing().addObserver(ba.closeObserver());
    f.closing().addObserver(bb.closeObserver());
    // Hummingbird B decides to sleep in:
    f.opening().deleteObserver(hb.openObserver());
    // A change that interests observers:
    f.open();
    f.open(); // It's already open, no change.
    // Bee A doesn't want to go to bed:
    f.closing().deleteObserver(ba.closeObserver());
    f.close();
    f.close(); // It's already closed; no change
    f.opening().deleteObservers();
    f.open();
    f.close();
  }
} ///:~
The events of interest are that a
Flower can open or close. Because of the use of the inner class idiom,
both these events can be separately-observable phenomena. OpenNotifier
and CloseNotifier both inherit Observable, so they have access to
setChanged( ) and can be handed to anything that needs an
Observable.
The inner class idiom also comes in handy
to define more than one kind of Observer, in Bee and
Hummingbird, since both those classes may want to independently observe
Flower openings and closings. Notice how the inner class idiom provides
something that has most of the benefits of inheritance (the ability to access
the private data in the outer class, for example) without the same
restrictions.
In main( ), you can see one
of the prime benefits of the observer pattern: the ability to change behavior at
runtime by dynamically registering and un-registering Observers with
Observables.
If you study the code above you’ll
see that OpenNotifier and CloseNotifier use the basic
Observable interface. This means that you could inherit other completely
different Observer classes; the only connection the Observers have
with Flowers is the Observer
interface.
The following example is similar to the
ColorBoxes example from Chapter 14. Boxes are placed in a grid on the
screen and each one is initialized to a random color. In addition, each box
implements the Observer interface and is
registered with an Observable object. When you click on a box, all of the
other boxes are notified that a change has been made because the
Observable object automatically calls each Observer object’s
update( ) method. Inside this method, the box checks to see if
it’s adjacent to the one that was clicked, and if so it changes its color
to match the clicked box.
//: c16:BoxObserver.java
// Demonstration of Observer pattern using
// Java's built-in observer classes.
import javax.swing.*;
import java.awt.*;
import java.awt.event.*;
import java.util.*;
import com.bruceeckel.swing.*;

// You must inherit a new type of Observable:
class BoxObservable extends Observable {
  public void notifyObservers(Object b) {
    // Otherwise it won't propagate changes:
    setChanged();
    super.notifyObservers(b);
  }
}

public class BoxObserver extends JFrame {
  Observable notifier = new BoxObservable();
  public BoxObserver(int grid) {
    setTitle("Demonstrates Observer pattern");
    Container cp = getContentPane();
    cp.setLayout(new GridLayout(grid, grid));
    for(int x = 0; x < grid; x++)
      for(int y = 0; y < grid; y++)
        cp.add(new OCBox(x, y, notifier));
  }
  public static void main(String[] args) {
    int grid = 8;
    if(args.length > 0)
      grid = Integer.parseInt(args[0]);
    JFrame f = new BoxObserver(grid);
    f.setSize(500, 400);
    f.setVisible(true);
//#f.setDefaultCloseOperation(EXIT_ON_CLOSE);
    f.addWindowListener(new WClose()); // 1.2
  }
}

class OCBox extends JPanel implements Observer {
  Observable notifier;
  int x, y; // Locations in grid
  Color cColor = newColor();
  static final Color[] colors = {
    Color.black, Color.blue, Color.cyan,
    Color.darkGray, Color.gray, Color.green,
    Color.lightGray, Color.magenta,
    Color.orange, Color.pink, Color.red,
    Color.white, Color.yellow
  };
  static final Color newColor() {
    return colors[
      (int)(Math.random() * colors.length)
    ];
  }
  OCBox(int x, int y, Observable notifier) {
    this.x = x;
    this.y = y;
    notifier.addObserver(this);
    this.notifier = notifier;
    addMouseListener(new ML());
  }
  public void paintComponent(Graphics g) {
    super.paintComponent(g);
    g.setColor(cColor);
    Dimension s = getSize();
    g.fillRect(0, 0, s.width, s.height);
  }
  class ML extends MouseAdapter {
    public void mousePressed(MouseEvent e) {
      notifier.notifyObservers(OCBox.this);
    }
  }
  public void update(Observable o, Object arg) {
    OCBox clicked = (OCBox)arg;
    if(nextTo(clicked)) {
      cColor = clicked.cColor;
      repaint();
    }
  }
  private final boolean nextTo(OCBox b) {
    return Math.abs(x - b.x) <= 1 &&
           Math.abs(y - b.y) <= 1;
  }
} ///:~
When you first look at the online
documentation for Observable, it’s a bit confusing because it
appears that you can use an ordinary Observable object to manage the
updates. But this doesn’t work; try it – inside BoxObserver,
create an Observable object instead of a BoxObservable object and
see what happens: nothing. To get an effect, you must inherit from
Observable and somewhere in your derived-class code call
setChanged( ). This is the method that sets
the “changed” flag, which means that when you call
notifyObservers( ) all of the observers
will, in fact, get notified. In the example above setChanged( ) is
simply called within notifyObservers( ), but you could use any
criterion you want to decide when to call setChanged( ).
BoxObserver contains a single
Observable object called notifier, and every time an OCBox
object is created, it is tied to notifier. In OCBox, whenever you
click the mouse the notifyObservers( ) method is called, passing the
clicked object in as an argument so that all the boxes receiving the message (in
their update( ) method) know who was clicked and can decide whether
to change themselves or not. Using a combination of code in
notifyObservers( ) and update( ) you can work out some
fairly complex schemes.
It might appear that the way the
observers are notified must be frozen at compile time in the
notifyObservers( ) method. However, if you look more closely at the
code above you’ll see that the only place in BoxObserver or
OCBox where you're aware that you’re working with a
BoxObservable is at the point of creation of the Observable object
– from then on everything uses the basic Observable interface. This
means that you could inherit other Observable classes and swap them at
run-time if you want to change notification behavior
then.
When dealing with multiple types which
are interacting, a program can get particularly messy. For example, consider a
system that parses and executes mathematical expressions. You want to be able to
say Number + Number, Number * Number, etc., where Number is
the base class for a family of numerical objects. But when you say a + b,
and you don’t know the exact type of either a or b, so how
can you get them to interact properly?
The answer starts with something you
probably don’t think about: Java performs only single dispatching. That
is, if you are performing an operation on more than one object whose type is
unknown, Java can invoke the dynamic binding mechanism on only one of those
types. This doesn’t solve the problem, so you end up detecting some types
manually and effectively producing your own dynamic binding
behavior.
The solution is called
multiple dispatching.
Remember that polymorphism can occur only via member function calls, so if you
want double dispatching to occur, there must be two member function calls: the
first to determine the first unknown type, and the second to determine the
second unknown type. With multiple dispatching, you must have a virtual call to
determine each of the types. Generally, you’ll set up a configuration such
that a single member function call produces more than one dynamic member
function call and thus determines more than one type in the process. To get this
effect, you need to work with more than one virtual function: you’ll need
a virtual function call for each dispatch. The virtual functions in the
following example are called compete( ) and eval( ), and
are both members of the same type. (In this case there will be only two
dispatches, which is referred to as
double dispatching). If
you are working with two different type hierarchies that are interacting, then
you’ll have to have a virtual call in each hierarchy.
Here’s an example of multiple
dispatching:
//: c16:PaperScissorsRock.java
// Demonstration of multiple dispatching
import java.util.*;

// An enumeration type:
class Outcome {
  private int value;
  private Outcome(int val) { value = val; }
  public final static Outcome
    WIN = new Outcome(0),
    LOSE = new Outcome(1),
    DRAW = new Outcome(2);
  public String toString() {
    switch(value) {
      default:
      case 0: return "win";
      case 1: return "lose";
      case 2: return "draw";
    }
  }
  public boolean equals(Object o) {
    return (o instanceof Outcome)
      && (value == ((Outcome)o).value);
  }
}

interface Item {
  Outcome compete(Item it);
  Outcome eval(Paper p);
  Outcome eval(Scissors s);
  Outcome eval(Rock r);
}

class Paper implements Item {
  public Outcome compete(Item it) {
    return it.eval(this);
  }
  public Outcome eval(Paper p) {
    return Outcome.DRAW;
  }
  public Outcome eval(Scissors s) {
    return Outcome.WIN;
  }
  public Outcome eval(Rock r) {
    return Outcome.LOSE;
  }
  public String toString() { return "Paper"; }
}

class Scissors implements Item {
  public Outcome compete(Item it) {
    return it.eval(this);
  }
  public Outcome eval(Paper p) {
    return Outcome.LOSE;
  }
  public Outcome eval(Scissors s) {
    return Outcome.DRAW;
  }
  public Outcome eval(Rock r) {
    return Outcome.WIN;
  }
  public String toString() { return "Scissors"; }
}

class Rock implements Item {
  public Outcome compete(Item it) {
    return it.eval(this);
  }
  public Outcome eval(Paper p) {
    return Outcome.WIN;
  }
  public Outcome eval(Scissors s) {
    return Outcome.LOSE;
  }
  public Outcome eval(Rock r) {
    return Outcome.DRAW;
  }
  public String toString() { return "Rock"; }
}

class ItemFactory {
  public static Item newItem() {
    switch((int)(Math.random() * 3)) {
      default:
      case 0:
        return new Scissors();
      case 1:
        return new Paper();
      case 2:
        return new Rock();
    }
  }
}

class Compete {
  public static Outcome match(Item a, Item b) {
    System.out.print(a + " <--> " + b + " : ");
    return a.compete(b);
  }
}

public class PaperScissorsRock {
  public static void main(String args[]) {
    ArrayList items = new ArrayList();
    for(int i = 0; i < 40; i++)
      items.add(ItemFactory.newItem());
    for(int i = 0; i < items.size()/2; i++)
      System.out.println(
        Compete.match(
          (Item)items.get(i),
          (Item)items.get(i*2)));
  }
} ///:~The assumption is that you have a primary
class hierarchy that is fixed; perhaps it’s from another vendor and you
can’t make changes to that hierarchy. However, you’d like to add new
polymorphic methods to that hierarchy, which means that normally you’d
have to add something to the base class interface. So the dilemma is that you
need to add methods to the base class, but you can’t touch the base class.
How do you get around this?
The design pattern that solves this kind
of problem is called a “visitor” (the final one in the Design
Patterns book), and it builds on the double dispatching scheme shown
in the last section.
The
visitor pattern allows you to
extend the interface of the primary type by creating a separate class hierarchy
of type Visitor to virtualize the operations performed upon the primary
type. The objects of the primary type simply “accept” the visitor,
then call the visitor’s dynamically-bound member
function.
//: c16:BeeAndFlowers.java
// Demonstration of "visitor" pattern
import java.util.*;

interface Visitor {
  void visit(Gladiolus g);
  void visit(Renuculus r);
  void visit(Chrysanthemum c);
}

// The Flower hierarchy cannot be changed:
interface Flower {
  void accept(Visitor v);
}

class Gladiolus implements Flower {
  public void accept(Visitor v) { v.visit(this);}
}

class Renuculus implements Flower {
  public void accept(Visitor v) { v.visit(this);}
}

class Chrysanthemum implements Flower {
  public void accept(Visitor v) { v.visit(this);}
}

// Add the ability to produce a string:
class StringVal implements Visitor {
  String s;
  public String toString() { return s; }
  public void visit(Gladiolus g) {
    s = "Gladiolus";
  }
  public void visit(Renuculus r) {
    s = "Renuculus";
  }
  public void visit(Chrysanthemum c) {
    s = "Chrysanthemum";
  }
}

// Add the ability to do "Bee" activities:
class Bee implements Visitor {
  public void visit(Gladiolus g) {
    System.out.println("Bee and Gladiolus");
  }
  public void visit(Renuculus r) {
    System.out.println("Bee and Renuculus");
  }
  public void visit(Chrysanthemum c) {
    System.out.println("Bee and Chrysanthemum");
  }
}

class FlowerFactory {
  public static Flower newFlower() {
    switch((int)(Math.random() * 3)) {
      default:
      case 0: return new Gladiolus();
      case 1: return new Renuculus();
      case 2: return new Chrysanthemum();
    }
  }
}

public class BeeAndFlowers {
  public static void main(String args[]) {
    ArrayList flowers = new ArrayList();
    for(int i = 0; i < 10; i++)
      flowers.add(FlowerFactory.newFlower());
    // It's almost as if I had added a function
    // to produce a Flower string representation:
    StringVal sval = new StringVal();
    Iterator it = flowers.iterator();
    while(it.hasNext()) {
      ((Flower)it.next()).accept(sval);
      System.out.println(sval);
    }
    // Perform "Bee" operation on all Flowers:
    Bee bee = new Bee();
    it = flowers.iterator();
    while(it.hasNext())
      ((Flower)it.next()).accept(bee);
  }
} ///:~The remainder of the chapter will look at
the process of solving a problem by applying design patterns in an evolutionary
fashion. That is, a first cut design will be used for the initial solution, and
then this solution will be examined and various design patterns will be applied
to the problem (some of which will work, and some of which won’t). The key
question that will always be asked in seeking improved solutions is “what
will change?”
This process is similar to what Martin
Fowler talks about in his book Refactoring: Improving the Design of Exsting
Code[70]
(although he tends to talk about pieces of code more than pattern-level
designs). You start with a solution, and then when you discover that it
doesn’t continue to meet your needs, you fix it. Of course, this is a
natural tendency but in computer programming it’s been extremely difficult
to accomplish with procedural programs, and the acceptance of the idea that we
can refactor code and designs adds to the body of proof that
object-oriented programming is “a good
thing.”
The nature of this problem is that the
trash is thrown unclassified into a single bin, so the specific type information
is lost. But later, the specific type information must be recovered to properly
sort the trash. In the initial solution, RTTI (described in Chapter 11) is
used.
This is not a trivial design because it
has an added constraint. That’s what makes it interesting –
it’s more like the messy problems you’re likely to encounter in your
work. The extra constraint is that the trash arrives at the trash recycling
plant all mixed together. The program must model the sorting of that trash. This
is where RTTI comes in: you have a bunch of anonymous pieces of trash, and the
program figures out exactly what type they are.
//: c16:recyclea:RecycleA.java
// Recycling with RTTI
package c16.recyclea;
import java.util.*;
import java.io.*;

abstract class Trash {
  private double weight;
  Trash(double wt) { weight = wt; }
  abstract double value();
  double weight() { return weight; }
  // Sums the value of Trash in a bin:
  static void sumValue(ArrayList bin) {
    Iterator e = bin.iterator();
    double val = 0.0f;
    while(e.hasNext()) {
      // One kind of RTTI:
      // A dynamically-checked cast
      Trash t = (Trash)e.next();
      // Polymorphism in action:
      val += t.weight() * t.value();
      System.out.println(
        "weight of " +
        // Using RTTI to get type
        // information about the class:
        t.getClass().getName() +
        " = " + t.weight());
    }
    System.out.println("Total value = " + val);
  }
}

class Aluminum extends Trash {
  static double val  = 1.67f;
  Aluminum(double wt) { super(wt); }
  double value() { return val; }
  static void value(double newval) {
    val = newval;
  }
}

class Paper extends Trash {
  static double val = 0.10f;
  Paper(double wt) { super(wt); }
  double value() { return val; }
  static void value(double newval) {
    val = newval;
  }
}

class Glass extends Trash {
  static double val = 0.23f;
  Glass(double wt) { super(wt); }
  double value() { return val; }
  static void value(double newval) {
    val = newval;
  }
}

public class RecycleA {
  public static void main(String[] args) {
    ArrayList bin = new ArrayList();
    // Fill up the Trash bin:
    for(int i = 0; i < 30; i++)
      switch((int)(Math.random() * 3)) {
        case 0 :
          bin.add(new
            Aluminum(Math.random() * 100));
          break;
        case 1 :
          bin.add(new
            Paper(Math.random() * 100));
          break;
        case 2 :
          bin.add(new
            Glass(Math.random() * 100));
      }
    ArrayList
      glassBin = new ArrayList(),
      paperBin = new ArrayList(),
      alBin = new ArrayList();
    Iterator sorter = bin.iterator();
    // Sort the Trash:
    while(sorter.hasNext()) {
      Object t = sorter.next();
      // RTTI to show class membership:
      if(t instanceof Aluminum)
        alBin.add(t);
      if(t instanceof Paper)
        paperBin.add(t);
      if(t instanceof Glass)
        glassBin.add(t);
    }
    Trash.sumValue(alBin);
    Trash.sumValue(paperBin);
    Trash.sumValue(glassBin);
    Trash.sumValue(bin);
  }
} ///:~package c16.recyclea;
This means that in the source code
listings available for the book, this file will be placed in the subdirectory
recyclea that branches off from the subdirectory c16 (for Chapter
16). The unpacking tool takes care of placing it into the correct subdirectory.
The reason for doing this is that this chapter rewrites this particular example
a number of times and by putting each version in its own package the
class names will not clash.
Several
ArrayList objects are created to hold
Trash handles. Of course, ArrayLists actually hold
Objects so they’ll hold anything at all. The reason they hold
Trash (or something derived from Trash) is only because
you’ve been careful to not put in anything except Trash. If you do
put something “wrong” into the ArrayList, you won’t get
any compile-time warnings or errors – you’ll find out only via an
exception at run-time.
When the Trash handles are added,
they lose their specific identities and become simply Object handles
(they are upcast). However, because of
polymorphism the proper behavior still occurs when the
dynamically-bound methods are called through the
Iterator sorter, once the resulting
Object has been cast back to Trash.
sumValue( ) also uses an Iterator to perform operations on
every object in the ArrayList.
It looks silly to upcast the types of
Trash into a collection holding base type handles, and then turn around
and downcast. Why not just put the trash into the appropriate receptacle in the
first place? (Indeed, this is the whole enigma of recycling). In this program it
would be easy to repair, but sometimes a system’s structure and
flexibility can benefit greatly from downcasting.
The program satisfies the design
requirements: it works. This might be fine as long as it’s a one-shot
solution. However, a useful program tends to evolve over time, so you must ask,
“What if the situation changes?” For example, cardboard is now a
valuable recyclable commodity, so how will that be integrated into the system
(especially if the program is large and complicated). Since the above
type-check coding in the switch statement could
be scattered throughout the program, you must go find all that code every time a
new type is added, and if you miss one the compiler won’t give you any
help by pointing out an error.
The key to the
misuse of RTTI here is that every type is tested.
If you’re looking for only a subset of types because that subset needs
special treatment, that’s probably fine. But if you’re hunting for
every type inside a switch statement, then you’re probably missing an
important point, and definitely making your code less maintainable. In the next
section we’ll look at how this program evolved over several stages to
become much more flexible. This should prove a valuable example in program
design.
The solutions in Design Patterns
are organized around the question “What will change as this program
evolves?” This is usually the most important question that you can ask
about any design. If you can build your system around the answer, the results
will be two-pronged: not only will your system allow easy (and inexpensive)
maintenance, but you might also produce components that are reusable, so that
other systems can be built more cheaply. This is the promise of object-oriented
programming, but it doesn’t happen automatically; it requires thought and
insight on your part. In this section we’ll see how this process can
happen during the refinement of a system.
The answer to the question “What
will change?” for the recycling system is a common one: more types will be
added to the system. The goal of the design, then, is to make this addition of
types as painless as possible. In the recycling program, we’d like to
encapsulate all places where specific type information is mentioned, so (if for
no other reason) any changes can be localized to those encapsulations. It turns
out that this process also cleans up the rest of the code
considerably.
This brings up a general object-oriented
design principle that I first heard spoken by Grady
Booch: “If the design is too complicated, make more objects.” This
is simultaneously counterintuitive and ludicrously simple, and yet it’s
the most useful guideline I’ve found. (You might observe that
“making more objects” is often equivalent to “add another
level of indirection.”) In general, if you find a place with messy code,
consider what sort of class would clean that up. Often the side effect of
cleaning up the code will be a system that has better structure and is more
flexible.
Consider first the place where
Trash objects are created, which is a switch statement inside
main( ):
    for(int i = 0; i < 30; i++)
      switch((int)(Math.random() * 3)) {
        case 0 :
          bin.add(new
            Aluminum(Math.random() * 100));
          break;
        case 1 :
          bin.add(new
            Paper(Math.random() * 100));
          break;
        case 2 :
          bin.add(new
            Glass(Math.random() * 100));
      }
This is definitely messy, and also a
place where you must change code whenever a new type is added. If new types are
commonly added, a better solution is a single method that takes all of the
necessary information and produces a handle to an object of the correct type,
already upcast to a trash object. In Design Patterns this is broadly
referred to as a creational
pattern (of which there are several). The specific pattern that will be
applied here is a variant of the
Factory Method. Here, the
factory method is a static member of Trash, but more commonly it
is a method that is overridden in the derived class.
The idea of the factory method is that
you pass it the essential information it needs to know to create your object,
then stand back and wait for the handle (already upcast to the base type) to pop
out as the return value. From then on, you treat the object polymorphically.
Thus, you never even need to know the exact type of object that’s created.
In fact, the factory method hides it from you to prevent accidental misuse. If
you want to use the object without polymorphism, you must explicitly use RTTI
and casting.
But there’s a little problem,
especially when you use the more complicated approach (not shown here) of making
the factory method in the base class and overriding it in the derived classes.
What if the information required in the derived class requires more or different
arguments? “Creating more objects” solves this problem. To implement
the factory method, the Trash class gets a new method called
factory. To hide the creational data, there’s a new class called
Info that contains all of the necessary information for the
factory method to create the appropriate Trash object.
Here’s a simple implementation of Info:
class Info {
  int type;
  // Must change this to add another type:
  static final int MAX_NUM = 4;
  double data;
  Info(int typeNum, double dat) {
    type = typeNum % MAX_NUM;
    data = dat;
  }
}
An Info object’s only job is
to hold information for the factory( ) method. Now, if there’s
a situation in which factory( ) needs more or different information
to create a new type of Trash object, the factory( )
interface doesn’t need to be changed. The Info class can be changed
by adding new data and new constructors, or in the more typical object-oriented
fashion of subclassing.
The factory( ) method for
this simple example looks like this:
  static Trash factory(Info i) {
    switch(i.type) {
      default: // To quiet the compiler
      case 0:
        return new Aluminum(i.data);
      case 1:
        return new Paper(i.data);
      case 2:
        return new Glass(i.data);
      // Two lines here:
      case 3:
        return new Cardboard(i.data);
    }
  }
Here, the determination of the exact type
of object is simple, but you can imagine a more complicated system in which
factory( ) uses an elaborate algorithm. The point is that it’s
now hidden away in one place, and you know to come to this place when you add
new types.
The creation of new objects is now much
simpler in main( ):
    for(int i = 0; i < 30; i++)
      bin.add(
        Trash.factory(
          new Info(
            (int)(Math.random() * Info.MAX_NUM),
            Math.random() * 100)));
An Info object is created to pass
the data into factory( ), which in turn produces some kind of
Trash object on the heap and returns the handle that’s added to the
ArrayList bin. Of course, if you change the quantity and type of
argument, this statement will still need to be modified, but that can be
eliminated if the creation of the Info object is automated. For example,
a ArrayList of arguments can be passed into the constructor of an
Info object (or directly into a factory( ) call, for that
matter). This requires that the arguments be parsed and checked at runtime, but
it does provide the greatest flexibility.
You can see from this code what
“vector
of change” problem the factory is responsible for solving: if you add new
types to the system (the change), the only code that must be modified is within
the factory, so the factory isolates the effect of that
change.
A problem with the design above is that
it still requires a central location where all the types of the objects must be
known: inside the factory( ) method. If new types are regularly
being added to the system, the factory( ) method must be changed for
each new type. When you discover something like this, it is useful to try to go
one step further and move all of the information about the type –
including its creation – into the class representing that type. This way,
the only thing you need to do to add a new type to the system is to inherit a
single class.
To move the information concerning type
creation into each specific type of Trash, the
“prototype” pattern
(from the Design Patterns book) will be used. The general idea is that
you have a master sequence of objects, one of each type you’re interested
in making. The objects in this sequence are used only for making new
objects, using an operation that’s not unlike the
clone( ) scheme built into Java’s root
class Object. In this case, we’ll name the cloning method
tClone( ). When you’re ready to make a new object,
presumably you have some sort of information that establishes the type of object
you want to create, then you move through the master sequence comparing your
information with whatever appropriate information is in the prototype objects in
the master sequence. When you find one that matches your needs, you clone
it.
In this scheme there is no hard-coded
information for creation. Each object knows how to expose appropriate
information and how to clone itself. Thus, the factory( ) method
doesn’t need to be changed when a new type is added to the system.
One approach to the problem of
prototyping is to add a number of methods to support the creation of new
objects. However, in Java 1.1 there’s already support for creating new
objects if you have a handle to the Class object. With
Java 1.1 reflection
(introduced in Chapter 11) you can call a constructor even if you have only a
handle to the Class object. This is the perfect solution for the
prototyping problem.
The list of prototypes will be
represented indirectly by a list of handles to all the Class objects you
want to create. In addition, if the prototyping fails, the
factory( ) method will assume that it’s because a particular
Class object wasn’t in the list, and it will attempt to load it. By
loading the prototypes dynamically like this, the Trash class
doesn’t need to know what types it is working with, so it doesn’t
need any modifications when you add new types. This allows it to be easily
reused throughout the rest of the chapter.
//: c16:trash:Trash.java
// Base class for Trash recycling examples
package c16.trash;
import java.util.*;
import java.lang.reflect.*;

public abstract class Trash {
  private double weight;
  Trash(double wt) { weight = wt; }
  Trash() {}
  public abstract double value();
  public double weight() { return weight; }
  // Sums the value of Trash in a bin:
  public static void sumValue(ArrayList bin) {
    Iterator e = bin.iterator();
    double val = 0.0f;
    while(e.hasNext()) {
      // One kind of RTTI:
      // A dynamically-checked cast
      Trash t = (Trash)e.next();
      val += t.weight() * t.value();
      System.out.println(
        "weight of " +
        // Using RTTI to get type
        // information about the class:
        t.getClass().getName() +
        " = " + t.weight());
    }
    System.out.println("Total value = " + val);
  }
  // Remainder of class provides support for
  // prototyping:
  public static class PrototypeNotFoundException
      extends Exception {}
  public static class CannotCreateTrashException
      extends Exception {}
  private static ArrayList trashTypes =
    new ArrayList();
  public static Trash factory(Info info)
      throws PrototypeNotFoundException,
      CannotCreateTrashException {
    for(int i = 0; i < trashTypes.size(); i++) {
      // Somehow determine the new type
      // to create, and create one:
      Class tc =
        (Class)trashTypes.get(i);
      if (tc.getName().indexOf(info.id) != -1) {
        try {
          // Get the dynamic constructor method
          // that takes a double argument:
          Constructor ctor =
            tc.getConstructor(
              new Class[] {double.class});
          // Call the constructor to create a
          // new object:
          return (Trash)ctor.newInstance(
            new Object[]{new Double(info.data)});
        } catch(Exception ex) {
          ex.printStackTrace();
          throw new CannotCreateTrashException();
        }
      }
    }
    // Class was not in the list. Try to load it,
    // but it must be in your class path!
    try {
      System.out.println("Loading " + info.id);
      trashTypes.add(
        Class.forName(info.id));
    } catch(Exception e) {
      e.printStackTrace();
      throw new PrototypeNotFoundException();
    }
    // Loaded successfully. Recursive call
    // should work this time:
    return factory(info);
  }
  public static class Info {
    public String id;
    public double data;
    public Info(String name, double data) {
      id = name;
      this.data = data;
    }
  }
} ///:~
The basic Trash class and
sumValue( ) remain as before. The rest of the class supports the
prototyping pattern. You first see two
inner classes (which are made
static, so they are inner classes only for code organization purposes)
describing exceptions that can occur. This is followed by a ArrayList
trashTypes, which is used to hold the Class handles.
In Trash.factory( ), the
String inside the Info object id (a different version of
the Info class than that of the prior discussion) contains the type name
of the Trash to be created; this String is compared to the
Class names in the list. If there’s a match, then that’s the
object to create. Of course, there are many ways to determine what object you
want to make. This one is used so that information read in from a file can be
turned into objects.
Once you’ve discovered which kind
of Trash to create, then the reflection methods
come into play. The getConstructor( ) method
takes an argument that’s an array of Class
handles. This array represents the arguments, in their proper order, for the
constructor that you’re looking for. Here, the
array is dynamically created
using the Java 1.1 array-creation
syntax:
new Class[] {double.class}This code assumes that every Trash
type has a constructor that takes a double (and notice that
double.class is distinct from Double.class). It’s also
possible, for a more flexible solution, to call
getConstructors( ), which returns an array
of the possible constructors.
What comes back from
getConstructor( ) is a handle to a
Constructor object (part of
java.lang.reflect). You call the constructor dynamically with the method
newInstance( ), which takes an array of
Object containing the actual arguments. This array is again created using
the Java 1.1 syntax:
new Object[]{new Double(info.data)}In this case, however, the double
must be placed inside a wrapper class so that it can be part of this array of
objects. The process of calling newInstance( ) extracts the
double, but you can see it is a bit confusing – an argument might
be a double or a Double, but when you make the call you must
always pass in a Double. Fortunately, this issue exists only for the
primitive types.
Once you understand how to do it, the
process of creating a new object given only a Class handle is remarkably
simple. Reflection also allows you to call methods in this same dynamic
fashion.
Of course, the appropriate Class
handle might not be in the trashTypes list. In this case, the
return in the inner loop is never executed and you’ll drop out at
the end. Here, the program tries to rectify the situation by loading the
Class object dynamically and adding it to the trashTypes list. If
it still can’t be found something is really wrong, but if the load is
successful then the factory method is called
recursively to try
again.
As you’ll see, the beauty of this
design is that this code doesn’t need to be changed, regardless of the
different situations it will be used in (assuming that all Trash
subclasses contain a constructor that takes a single double
argument).
To fit into the prototyping scheme, the
only thing that’s required of each new subclass of Trash is that it
contain a constructor that takes a double argument. Java
1.1 reflection handles everything else.
Here are the different types of
Trash, each in their own file but part of the Trash package
(again, to facilitate reuse within the chapter):
//: c16:trash:Aluminum.java
// The Aluminum class with prototyping
package c16.trash;

public class Aluminum extends Trash {
  private static double val = 1.67f;
  public Aluminum(double wt) { super(wt); }
  public double value() { return val; }
  public static void value(double newVal) {
    val = newVal;
  }
} ///:~
//: c16:trash:Paper.java
// The Paper class with prototyping
package c16.trash;
public class Paper extends Trash {
private static double val = 0.10f;
public Paper(double wt) { super(wt); }
public double value() { return val; }
public static void value(double newVal) {
val = newVal;
}
} ///:~//: c16:trash:Glass.java
// The Glass class with prototyping
package c16.trash;
public class Glass extends Trash {
private static double val = 0.23f;
public Glass(double wt) { super(wt); }
public double value() { return val; }
public static void value(double newVal) {
val = newVal;
}
} ///:~And here’s a new type of
Trash:
//: c16:trash:Cardboard.java
// The Cardboard class with prototyping
package c16.trash;

public class Cardboard extends Trash {
  private static double val = 0.23f;
  public Cardboard(double wt) { super(wt); }
  public double value() { return val; }
  public static void value(double newVal) {
    val = newVal;
  }
} ///:~
You can see that, other than the
constructor, there’s nothing special about any of these
classes.
The information about Trash
objects will be read from an outside file. The file has all of the necessary
information about each piece of trash on a single line in the form
Trash:weight, such as:
//:! c16:trash:Trash.dat
c16.Trash.Glass:54
c16.Trash.Paper:22
c16.Trash.Paper:11
c16.Trash.Glass:17
c16.Trash.Aluminum:89
c16.Trash.Paper:88
c16.Trash.Aluminum:76
c16.Trash.Cardboard:96
c16.Trash.Aluminum:25
c16.Trash.Aluminum:34
c16.Trash.Glass:11
c16.Trash.Glass:68
c16.Trash.Glass:43
c16.Trash.Aluminum:27
c16.Trash.Cardboard:44
c16.Trash.Aluminum:18
c16.Trash.Paper:91
c16.Trash.Glass:63
c16.Trash.Glass:50
c16.Trash.Glass:80
c16.Trash.Aluminum:81
c16.Trash.Cardboard:12
c16.Trash.Glass:12
c16.Trash.Glass:54
c16.Trash.Aluminum:36
c16.Trash.Aluminum:93
c16.Trash.Glass:93
c16.Trash.Paper:80
c16.Trash.Glass:36
c16.Trash.Glass:12
c16.Trash.Glass:60
c16.Trash.Paper:66
c16.Trash.Aluminum:36
c16.Trash.Cardboard:22
///:~
Note that the class path must be included
when giving the class names, otherwise the class will not be
found.
To parse this, the line is read and the
String method
indexOf( ) produces the index of the
‘:’. This is first used with the String method
substring( ) to
extract the name of the trash type, and next to get the weight that is turned
into a double with the static
Double.valueOf( ) method. The
trim( ) method
removes white space at both ends of a string.
The Trash parser is placed in a
separate file since it will be reused throughout this chapter:
//: c16:trash:ParseTrash.java
// Open a file and parse its contents into
// Trash objects, placing each into a ArrayList
package c16.trash;
import java.util.*;
import java.io.*;

public class ParseTrash {
  public static void
  fillBin(String filename, Fillable bin) {
    try {
      BufferedReader data =
        new BufferedReader(
          new FileReader(filename));
      String buf;
      while((buf = data.readLine())!= null) {
        String type = buf.substring(0,
          buf.indexOf(':')).trim();
        double weight = Double.valueOf(
          buf.substring(buf.indexOf(':') + 1)
          .trim()).doubleValue();
        bin.addTrash(
          Trash.factory(
            new Trash.Info(type, weight)));
      }
      data.close();
    } catch(IOException e) {
      e.printStackTrace();
    } catch(Exception e) {
      e.printStackTrace();
    }
  }
  // Special case to handle ArrayList:
  public static void
  fillBin(String filename, ArrayList bin) {
    fillBin(filename, new FillableArrayList(bin));
  }
} ///:~
In RecycleA.java, a
ArrayList was used to hold the Trash objects. However, other types
of collections can be used as well. To allow for this, the first version of
fillBin( ) takes a handle to a Fillable, which is simply an
interface that supports a method called
addTrash( ):
//: c16:trash:Fillable.java
// Any object that can be filled with Trash
package c16.trash;

public interface Fillable {
  void addTrash(Trash t);
} ///:~
Anything that supports this interface can
be used with fillBin. Of course, ArrayList doesn’t implement
Fillable, so it won’t work. Since ArrayList is used in most
of the examples, it makes sense to add a second overloaded
fillBin( ) method that takes a ArrayList. The
ArrayList can be used as a Fillable object using an adapter
class:
//: c16:trash:FillableArrayList.java
// Adapter that makes a ArrayList Fillable
package c16.trash;
import java.util.*;

public class FillableArrayList
implements Fillable {
  private ArrayList v;
  public FillableArrayList(ArrayList vv) { v = vv; }
  public void addTrash(Trash t) {
    v.add(t);
  }
} ///:~
You can see that the only job of this
class is to connect Fillable’s addTrash( ) method to
ArrayList’s add( ). With this class in hand, the
overloaded fillBin( ) method can be used with a ArrayList in
ParseTrash.java:
  public static void
  fillBin(String filename, ArrayList bin) {
    fillBin(filename, new FillableArrayList(bin));
  }
This approach works for any collection
class that’s used frequently. Alternatively, the collection class can
provide its own adapter that implements Fillable. (You’ll see this
later, in DynaTrash.java.)
//: c16:recycleap:RecycleAP.java
// Recycling with RTTI and Prototypes
package c16.recycleap;
import c16.trash.*;
import java.util.*;

public class RecycleAP {
  public static void main(String[] args) {
    ArrayList bin = new ArrayList();
    // Fill up the Trash bin:
    ParseTrash.fillBin("Trash.dat", bin);
    ArrayList
      glassBin = new ArrayList(),
      paperBin = new ArrayList(),
      alBin = new ArrayList();
    Iterator sorter = bin.iterator();
    // Sort the Trash:
    while(sorter.hasNext()) {
      Object t = sorter.next();
      // RTTI to show class membership:
      if(t instanceof Aluminum)
        alBin.add(t);
      if(t instanceof Paper)
        paperBin.add(t);
      if(t instanceof Glass)
        glassBin.add(t);
    }
    Trash.sumValue(alBin);
    Trash.sumValue(paperBin);
    Trash.sumValue(glassBin);
    Trash.sumValue(bin);
  }
} ///:~
All of the Trash objects, as well
as the ParseTrash and support classes, are now part of the package
c16.trash so they are simply imported.
The process of opening the data file
containing Trash descriptions and the parsing of that file have been
wrapped into the static method ParseTrash.fillBin( ), so now
it’s no longer a part of our design focus. You will see that throughout
the rest of the chapter, no matter what new classes are added,
ParseTrash.fillBin( ) will continue to work without change, which
indicates a good design.
In terms of object creation, this design
does indeed severely localize the changes you need to make to add a new type to
the system. However, there’s a significant problem in the use of RTTI that
shows up clearly here. The program seems to run fine, and yet it never detects
any cardboard, even though there is cardboard in the list! This happens
because of the use of RTTI, which looks for only the types that you tell
it to look for. The clue that RTTI is being misused is
that every type in the system is being tested, rather than a single type
or subset of types. As you will see later, there are ways to use polymorphism
instead when you’re testing for every type. But if you use RTTI a lot in
this fashion, and you add a new type to your system, you can easily forget to
make the necessary changes in your program and produce a difficult-to-find bug.
So it’s worth trying to eliminate RTTI in this case, not just for
aesthetic reasons – it produces more maintainable
code.
With creation out of the way, it’s
time to tackle the remainder of the design: where the classes are used. Since
it’s the act of sorting into bins that’s particularly ugly and
exposed, why not take that process and hide it inside a class? This is the
principle of “If you must do something ugly, at least localize the
ugliness inside a class.” It looks like this:
The TrashSorter object
initialization must now be changed whenever a new type of Trash is added
to the model. You could imagine that the TrashSorter class might look
something like this:
class TrashSorter extends ArrayList {
  void sort(Trash t) { /* ... */ }
}
That is, TrashSorter is a
ArrayList of handles to ArrayLists of Trash handles, and
with add( ) you can install another one, like so:
TrashSorter ts = new TrashSorter();
ts.add(new ArrayList());
Now, however, sort( ) becomes
a problem. How does the statically-coded method deal with the fact that a new
type has been added? To solve this, the type information must be removed from
sort( ) so that all it needs to do is call a generic method that
takes care of the details of type. This, of course, is another way to describe a
dynamically-bound method. So sort( ) will simply move through the
sequence and call a dynamically-bound method for each ArrayList. Since
the job of this method is to grab the pieces of trash it is interested in,
it’s called grab(Trash). The structure now looks
like:
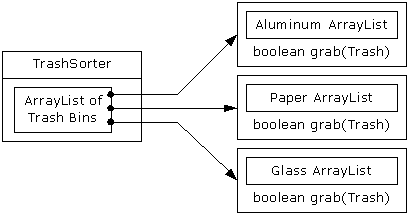
TrashSorter needs to call each
grab( ) method and get a different result depending on what type of
Trash the current ArrayList is holding. That is, each
ArrayList must be aware of the type it holds. The classic approach to
this problem is to create a base “Trash bin” class and
inherit a new derived class for each different type you want to hold. If Java
had a parameterized type mechanism that would probably be the most
straightforward approach. But rather than hand-coding all the classes that such
a mechanism should be building for us, further observation can produce a better
approach.
A basic OOP design principle is
“Use data members for variation in state, use
polymorphism for variation in behavior.” Your
first thought might be that the grab( ) method certainly behaves
differently for a ArrayList that holds Paper than for one that
holds Glass. But what it does is strictly dependent on the type, and
nothing else. This could be interpreted as a different state, and since Java has
a class to represent type (Class) this can be used to determine the type
of Trash a particular Tbin will hold.
The constructor for this Tbin
requires that you hand it the Class of your choice. This tells the
ArrayList what type it is supposed to hold. Then the grab( )
method uses Class BinType and RTTI to see if the Trash object
you’ve handed it matches the type it’s supposed to
grab.
Here is the whole program. The commented
numbers (e.g. (*1*) ) mark sections that will be described following the
code.
//: c16:recycleb:RecycleB.java
// Adding more objects to the recycling problem
package c16.recycleb;
import c16.trash.*;
import java.util.*;

// A vector that admits only the right type:
class Tbin extends ArrayList {
  Class binType;
  Tbin(Class binType) {
    this.binType = binType;
  }
  boolean grab(Trash t) {
    // Comparing class types:
    if(t.getClass().equals(binType)) {
      add(t);
      return true; // Object grabbed
    }
    return false; // Object not grabbed
  }
}

class TbinList extends ArrayList { //(*1*)
  boolean sort(Trash t) {
    Iterator e = iterator();
    while(e.hasNext()) {
      Tbin bin = (Tbin)e.next();
      if(bin.grab(t)) return true;
    }
    return false; // bin not found for t
  }
  void sortBin(Tbin bin) { // (*2*)
    Iterator e = bin.iterator();
    while(e.hasNext())
      if(!sort((Trash)e.next()))
        System.out.println("Bin not found");
  }
}

public class RecycleB {
  static Tbin bin = new Tbin(Trash.class);
  public static void main(String[] args) {
    // Fill up the Trash bin:
    ParseTrash.fillBin("Trash.dat", bin);

    TbinList trashBins = new TbinList();
    trashBins.add(
      new Tbin(Aluminum.class));
    trashBins.add(
      new Tbin(Paper.class));
    trashBins.add(
      new Tbin(Glass.class));
    // add one line here: (*3*)
    trashBins.add(
      new Tbin(Cardboard.class));

    trashBins.sortBin(bin); // (*4*)

    Iterator e = trashBins.iterator();
    while(e.hasNext()) {
      Tbin b = (Tbin)e.next();
      Trash.sumValue(b);
    }
    Trash.sumValue(bin);
  }
} ///:~The above design is certainly
satisfactory. Adding new types to the system consists of adding or modifying
distinct classes without causing code changes to be propagated throughout the
system. In addition, RTTI is not “misused” as it was in
RecycleA.java. However, it’s possible to go one step further and
take a purist viewpoint about RTTI and say that it
should be eliminated altogether from the operation of sorting the trash into
bins.
To accomplish this, you must first take
the perspective that all type-dependent activities – such as detecting the
type of a piece of trash and putting it into the appropriate bin – should
be controlled through polymorphism and dynamic binding.
The previous examples first sorted by
type, then acted on sequences of elements that were all of a particular type.
But whenever you find yourself picking out particular types, stop and think. The
whole idea of polymorphism (dynamically-bound method calls) is to handle
type-specific information for you. So why are you hunting for
types?
The answer is something you probably
don’t think about: Java performs only single dispatching. That is, if you
are performing an operation on more than one object whose type is unknown, Java
will invoke the dynamic binding mechanism on only one of those types. This
doesn’t solve the problem, so you end up detecting some types manually and
effectively producing your own dynamic binding behavior.
The solution is called
multiple dispatching,
which means setting up a configuration such that a single method call produces
more than one dynamic method call and thus determines more than one type in the
process. To get this effect, you need to work with more than one type hierarchy:
you’ll need a type hierarchy for each dispatch. The following example
works with two hierarchies: the existing Trash family and a hierarchy of
the types of trash bins that the trash will be placed into. This second
hierarchy isn’t always obvious and in this case it needed to be created in
order to produce multiple dispatching (in this case there will be only two
dispatches, which is referred to as
double
dispatching).
Remember that polymorphism can occur only
via method calls, so if you want double dispatching to occur, there must be two
method calls: one used to determine the type within each hierarchy. In the
Trash hierarchy there will be a new method called
addToBin( ), which takes an argument of an array of TypedBin.
It uses this array to step through and try to add itself to the appropriate bin,
and this is where you’ll see the double dispatch.
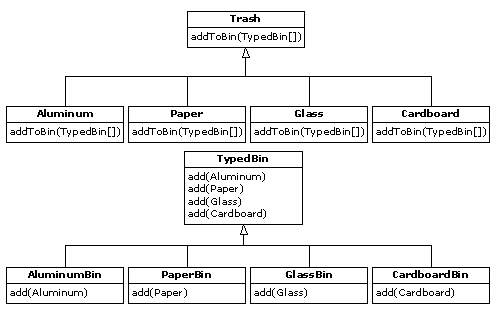
The new hierarchy is TypedBin, and
it contains its own method called add( ) that is also used
polymorphically. But here’s an additional twist: add( ) is
overloaded to take arguments of the different types of trash. So an
essential part of the double dispatching scheme also involves
overloading.
Redesigning the program produces a
dilemma: it’s now necessary for the base class Trash to contain an
addToBin( ) method. One approach is to copy all of the code and
change the base class. Another approach, which you can take when you don’t
have control of the source code, is to put the addToBin( ) method
into an interface, leave Trash alone, and inherit new specific
types of Aluminum, Paper, Glass, and Cardboard. This
is the approach that will be taken here.
Most of the classes in this design must
be public, so they are placed in their own files. Here’s the
interface:
//: c16:doubledispatch:TypedBinMember.java
// An interface for adding the double dispatching
// method to the trash hierarchy without
// modifying the original hierarchy.
package c16.doubledispatch;

interface TypedBinMember {
  // The new method:
  boolean addToBin(TypedBin[] tb);
} ///:~
In each particular subtype of
Aluminum, Paper, Glass, and Cardboard, the
addToBin( ) method in the interface TypedBinMember is
implemented,, but it looks like the code is exactly the same in each
case:
//: c16:doubledispatch:DDAluminum.java
// Aluminum for double dispatching
package c16.doubledispatch;
import c16.trash.*;

public class DDAluminum extends Aluminum
    implements TypedBinMember {
  public DDAluminum(double wt) { super(wt); }
  public boolean addToBin(TypedBin[] tb) {
    for(int i = 0; i < tb.length; i++)
      if(tb[i].add(this))
        return true;
    return false;
  }
} ///:~
//: c16:doubledispatch:DDPaper.java
// Paper for double dispatching
package c16.doubledispatch;
import c16.trash.*;
public class DDPaper extends Paper
implements TypedBinMember {
public DDPaper(double wt) { super(wt); }
public boolean addToBin(TypedBin[] tb) {
for(int i = 0; i < tb.length; i++)
if(tb[i].add(this))
return true;
return false;
}
} ///:~//: c16:doubledispatch:DDGlass.java
// Glass for double dispatching
package c16.doubledispatch;
import c16.trash.*;
public class DDGlass extends Glass
implements TypedBinMember {
public DDGlass(double wt) { super(wt); }
public boolean addToBin(TypedBin[] tb) {
for(int i = 0; i < tb.length; i++)
if(tb[i].add(this))
return true;
return false;
}
} ///:~//: c16:doubledispatch:DDCardboard.java
// Cardboard for double dispatching
package c16.doubledispatch;
import c16.trash.*;
public class DDCardboard extends Cardboard
implements TypedBinMember {
public DDCardboard(double wt) { super(wt); }
public boolean addToBin(TypedBin[] tb) {
for(int i = 0; i < tb.length; i++)
if(tb[i].add(this))
return true;
return false;
}
} ///:~The code in each addToBin( )
calls add( ) for each TypedBin object in the array. But
notice the argument: this. The type of this is different for each
subclass of Trash, so the code is different. (Although this code will
benefit if a parameterized type
mechanism is ever added to Java.) So this is the first part of the double
dispatch, because once you’re inside this method you know you’re
Aluminum, or Paper, etc. During the call to add( ),
this information is passed via the type of this. The compiler resolves
the call to the proper overloaded version of add( ). But
since tb[i] produces a handle to the base type TypedBin,
this call will end up calling a different method depending on the type of
TypedBin that’s currently selected. That is the second
dispatch.
Here’s the base class for
TypedBin:
//: c16:doubledispatch:TypedBin.java
// ArrayList that knows how to grab the right type
package c16.doubledispatch;
import c16.trash.*;
import java.util.*;

public abstract class TypedBin {
  ArrayList v = new ArrayList();
  protected boolean addIt(Trash t) {
    v.add(t);
    return true;
  }
  public Iterator elements() {
    return v.iterator();
  }
  public boolean add(DDAluminum a) {
    return false;
  }
  public boolean add(DDPaper a) {
    return false;
  }
  public boolean add(DDGlass a) {
    return false;
  }
  public boolean add(DDCardboard a) {
    return false;
  }
} ///:~
You can see that the overloaded
add( ) methods all return false. If the method is not
overloaded in a derived class, it will continue to return false, and the
caller (addToBin( ), in this case) will assume that the current
Trash object has not been added successfully to a collection, and
continue searching for the right collection.
In each of the subclasses of
TypedBin, only one overloaded method is overridden, according to the type
of bin that’s being created. For example, CardboardBin overrides
add(DDCardboard). The overridden method adds the trash object to its
collection and returns true, while all the rest of the add( )
methods in CardboardBin continue to return false, since they
haven’t been overridden. This is another case in which a parameterized
type mechanism in Java would allow automatic generation of code. (With
C++ templates, you
wouldn’t have to explicitly write the subclasses or place the
addToBin( ) method in Trash.)
Since for this example the trash types
have been customized and placed in a different directory, you’ll need a
different trash data file to make it work. Here’s a possible
DDTrash.dat:
//:! c16:DDTrash.dat
c16.DoubleDispatch.DDGlass:54
c16.DoubleDispatch.DDPaper:22
c16.DoubleDispatch.DDPaper:11
c16.DoubleDispatch.DDGlass:17
c16.DoubleDispatch.DDAluminum:89
c16.DoubleDispatch.DDPaper:88
c16.DoubleDispatch.DDAluminum:76
c16.DoubleDispatch.DDCardboard:96
c16.DoubleDispatch.DDAluminum:25
c16.DoubleDispatch.DDAluminum:34
c16.DoubleDispatch.DDGlass:11
c16.DoubleDispatch.DDGlass:68
c16.DoubleDispatch.DDGlass:43
c16.DoubleDispatch.DDAluminum:27
c16.DoubleDispatch.DDCardboard:44
c16.DoubleDispatch.DDAluminum:18
c16.DoubleDispatch.DDPaper:91
c16.DoubleDispatch.DDGlass:63
c16.DoubleDispatch.DDGlass:50
c16.DoubleDispatch.DDGlass:80
c16.DoubleDispatch.DDAluminum:81
c16.DoubleDispatch.DDCardboard:12
c16.DoubleDispatch.DDGlass:12
c16.DoubleDispatch.DDGlass:54
c16.DoubleDispatch.DDAluminum:36
c16.DoubleDispatch.DDAluminum:93
c16.DoubleDispatch.DDGlass:93
c16.DoubleDispatch.DDPaper:80
c16.DoubleDispatch.DDGlass:36
c16.DoubleDispatch.DDGlass:12
c16.DoubleDispatch.DDGlass:60
c16.DoubleDispatch.DDPaper:66
c16.DoubleDispatch.DDAluminum:36
c16.DoubleDispatch.DDCardboard:22
///:~
Here’s the rest of the
program:
//: c16:doubledispatch:DoubleDispatch.java
// Using multiple dispatching to handle more
// than one unknown type during a method call.
package c16.doubledispatch;
import c16.trash.*;
import java.util.*;

class AluminumBin extends TypedBin {
  public boolean add(DDAluminum a) {
    return addIt(a);
  }
}

class PaperBin extends TypedBin {
  public boolean add(DDPaper a) {
    return addIt(a);
  }
}

class GlassBin extends TypedBin {
  public boolean add(DDGlass a) {
    return addIt(a);
  }
}

class CardboardBin extends TypedBin {
  public boolean add(DDCardboard a) {
    return addIt(a);
  }
}

class TrashBinSet {
  private TypedBin[] binSet = {
    new AluminumBin(),
    new PaperBin(),
    new GlassBin(),
    new CardboardBin()
  };
  public void sortIntoBins(ArrayList bin) {
    Iterator e = bin.iterator();
    while(e.hasNext()) {
      TypedBinMember t =
        (TypedBinMember)e.next();
      if(!t.addToBin(binSet))
        System.err.println("Couldn't add " + t);
    }
  }
  public TypedBin[] binSet() { return binSet; }
}

public class DoubleDispatch {
  public static void main(String[] args) {
    ArrayList bin = new ArrayList();
    TrashBinSet bins = new TrashBinSet();
    // ParseTrash still works, without changes:
    ParseTrash.fillBin("DDTrash.dat", bin);
    // Sort from the master bin into the
    // individually-typed bins:
    bins.sortIntoBins(bin);
    TypedBin[] tb = bins.binSet();
    // Perform sumValue for each bin...
    for(int i = 0; i < tb.length; i++)
      Trash.sumValue(tb[i].v);
    // ... and for the master bin
    Trash.sumValue(bin);
  }
} ///:~
TrashBinSet encapsulates all of
the different types of TypedBins, along with the
sortIntoBins( ) method, which is where all the double dispatching
takes place. You can see that once the structure is set up, sorting into the
various TypedBins is remarkably easy. In addition, the efficiency of two
dynamic method calls is probably better than any other way you could
sort.
Notice the ease of use of this system in
main( ), as well as the complete independence of any specific type
information within main( ). All other methods that talk only to the
Trash base-class interface will be equally invulnerable to changes in
Trash types.
The changes necessary to add a new type
are relatively isolated: you inherit the new type of Trash with its
addToBin( ) method, then you inherit a new TypedBin (this is
really just a copy and simple edit), and finally you add a new type into the
aggregate initialization for
TrashBinSet.
Now consider applying a design pattern
with an entirely different goal to the trash-sorting problem.
For this pattern, we are no longer
concerned with optimizing the addition of new types of Trash to the
system. Indeed, this pattern makes adding a new type of Trash more
complicated. The assumption is that you have a primary class hierarchy that is
fixed; perhaps it’s from another vendor and you can’t make changes
to that hierarchy. However, you’d like to add new polymorphic methods to
that hierarchy, which means that normally you’d have to add something to
the base class interface. So the dilemma is that you need to add methods to the
base class, but you can’t touch the base class. How do you get around
this?
The design pattern that solves this kind
of problem is called a “visitor” (the final one in the Design
Patterns book), and it builds on the double dispatching scheme shown
in the last section.
The
visitor pattern allows you to
extend the interface of the primary type by creating a separate class hierarchy
of type Visitor to virtualize the operations performed upon the primary
type. The objects of the primary type simply “accept” the visitor,
then call the visitor’s dynamically-bound method. It looks like
this:
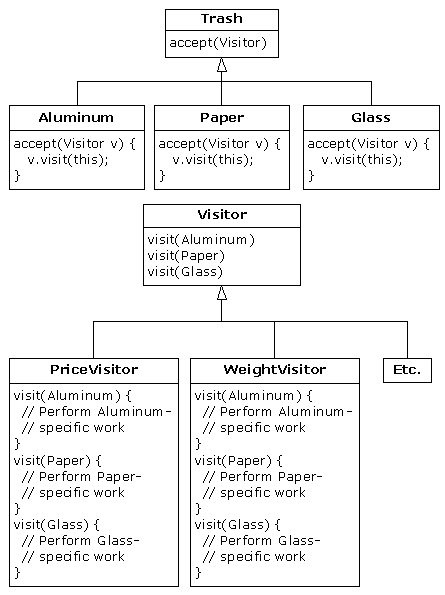
Now, if v is a Visitable
handle to an Aluminum object, the code:
PriceVisitor pv = new PriceVisitor();
v.accept(pv);
causes two polymorphic method calls: the
first one to select Aluminum’s version of accept( ),
and the second one within accept( ) when the specific version of
visit( ) is called dynamically using the base-class Visitor
handle v.
This configuration means that new
functionality can be added to the system in the form of new subclasses of
Visitor. The Trash hierarchy doesn’t need to be touched.
This is the prime benefit of the visitor pattern: you can add new polymorphic
functionality to a class hierarchy without touching that hierarchy (once the
accept( ) methods have been installed). Note that the benefit is
helpful here but not exactly what we started out to accomplish, so at first
blush you might decide that this isn’t the desired
solution.
But look at one thing that’s been
accomplished: the visitor solution avoids sorting from the master Trash
sequence into individual typed sequences. Thus, you can leave everything in the
single master sequence and simply pass through that sequence using the
appropriate visitor to accomplish the goal. Although this behavior seems to be a
side effect of visitor, it does give us what we want (avoiding
RTTI).
The
double dispatching in the
visitor pattern takes care of determining both the type of Trash and the
type of Visitor. In the following example, there are two
implementations of Visitor: PriceVisitor to both determine and sum
the price, and WeightVisitor to keep track of the
weights.
You can see all of this implemented in
the new, improved version of the recycling program. As with
DoubleDispatch.java, the Trash class is left alone and a new
interface is created to add the accept( ) method:
//: c16:trashvisitor:Visitable.java
// An interface to add visitor functionality to
// the Trash hierarchy without modifying the
// base class.
package c16.trashvisitor;
import c16.trash.*;

interface Visitable {
  // The new method:
  void accept(Visitor v);
} ///:~
The subtypes of Aluminum,
Paper, Glass, and Cardboard implement the
accept( ) method:
//: c16:trashvisitor:VAluminum.java
// Aluminum for the visitor pattern
package c16.trashvisitor;
import c16.trash.*;

public class VAluminum extends Aluminum
    implements Visitable {
  public VAluminum(double wt) { super(wt); }
  public void accept(Visitor v) {
    v.visit(this);
  }
} ///:~
//: c16:trashvisitor:VPaper.java
// Paper for the visitor pattern
package c16.trashvisitor;
import c16.trash.*;
public class VPaper extends Paper
implements Visitable {
public VPaper(double wt) { super(wt); }
public void accept(Visitor v) {
v.visit(this);
}
} ///:~//: c16:trashvisitor:VGlass.java
// Glass for the visitor pattern
package c16.trashvisitor;
import c16.trash.*;
public class VGlass extends Glass
implements Visitable {
public VGlass(double wt) { super(wt); }
public void accept(Visitor v) {
v.visit(this);
}
} ///:~//: c16:trashvisitor:VCardboard.java
// Cardboard for the visitor pattern
package c16.trashvisitor;
import c16.trash.*;
public class VCardboard extends Cardboard
implements Visitable {
public VCardboard(double wt) { super(wt); }
public void accept(Visitor v) {
v.visit(this);
}
} ///:~Since there’s nothing concrete in
the Visitor base class, it can be created as an
interface:
//: c16:trashvisitor:Visitor.java
// The base interface for visitors
package c16.trashvisitor;
import c16.trash.*;

interface Visitor {
  void visit(VAluminum a);
  void visit(VPaper p);
  void visit(VGlass g);
  void visit(VCardboard c);
} ///:~
Once again custom Trash types have
been created in a different subdirectory. The new Trash data file is
VTrash.dat and looks like this:
//:! c16:trashvisitor:VTrash.dat
c16.TrashVisitor.VGlass:54
c16.TrashVisitor.VPaper:22
c16.TrashVisitor.VPaper:11
c16.TrashVisitor.VGlass:17
c16.TrashVisitor.VAluminum:89
c16.TrashVisitor.VPaper:88
c16.TrashVisitor.VAluminum:76
c16.TrashVisitor.VCardboard:96
c16.TrashVisitor.VAluminum:25
c16.TrashVisitor.VAluminum:34
c16.TrashVisitor.VGlass:11
c16.TrashVisitor.VGlass:68
c16.TrashVisitor.VGlass:43
c16.TrashVisitor.VAluminum:27
c16.TrashVisitor.VCardboard:44
c16.TrashVisitor.VAluminum:18
c16.TrashVisitor.VPaper:91
c16.TrashVisitor.VGlass:63
c16.TrashVisitor.VGlass:50
c16.TrashVisitor.VGlass:80
c16.TrashVisitor.VAluminum:81
c16.TrashVisitor.VCardboard:12
c16.TrashVisitor.VGlass:12
c16.TrashVisitor.VGlass:54
c16.TrashVisitor.VAluminum:36
c16.TrashVisitor.VAluminum:93
c16.TrashVisitor.VGlass:93
c16.TrashVisitor.VPaper:80
c16.TrashVisitor.VGlass:36
c16.TrashVisitor.VGlass:12
c16.TrashVisitor.VGlass:60
c16.TrashVisitor.VPaper:66
c16.TrashVisitor.VAluminum:36
c16.TrashVisitor.VCardboard:22
///:~
The rest of the program creates specific
Visitor types and sends them through a single list of Trash
objects:
//: c16:trashvisitor:TrashVisitor.java
// The "visitor" pattern
package c16.trashvisitor;
import c16.trash.*;
import java.util.*;

// Specific group of algorithms packaged
// in each implementation of Visitor:
class PriceVisitor implements Visitor {
  private double alSum; // Aluminum
  private double pSum; // Paper
  private double gSum; // Glass
  private double cSum; // Cardboard
  public void visit(VAluminum al) {
    double v = al.weight() * al.value();
    System.out.println(
      "value of Aluminum= " + v);
    alSum += v;
  }
  public void visit(VPaper p) {
    double v = p.weight() * p.value();
    System.out.println(
      "value of Paper= " + v);
    pSum += v;
  }
  public void visit(VGlass g) {
    double v = g.weight() * g.value();
    System.out.println(
      "value of Glass= " + v);
    gSum += v;
  }
  public void visit(VCardboard c) {
    double v = c.weight() * c.value();
    System.out.println(
      "value of Cardboard = " + v);
    cSum += v;
  }
  void total() {
    System.out.println(
      "Total Aluminum: $" + alSum + "\n" +
      "Total Paper: $" + pSum + "\n" +
      "Total Glass: $" + gSum + "\n" +
      "Total Cardboard: $" + cSum);
  }
}

class WeightVisitor implements Visitor {
  private double alSum; // Aluminum
  private double pSum; // Paper
  private double gSum; // Glass
  private double cSum; // Cardboard
  public void visit(VAluminum al) {
    alSum += al.weight();
    System.out.println("weight of Aluminum = "
        + al.weight());
  }
  public void visit(VPaper p) {
    pSum += p.weight();
    System.out.println("weight of Paper = "
        + p.weight());
  }
  public void visit(VGlass g) {
    gSum += g.weight();
    System.out.println("weight of Glass = "
        + g.weight());
  }
  public void visit(VCardboard c) {
    cSum += c.weight();
    System.out.println("weight of Cardboard = "
        + c.weight());
  }
  void total() {
    System.out.println("Total weight Aluminum:"
        + alSum);
    System.out.println("Total weight Paper:"
        + pSum);
    System.out.println("Total weight Glass:"
        + gSum);
    System.out.println("Total weight Cardboard:"
        + cSum);
  }
}

public class TrashVisitor {
  public static void main(String[] args) {
    ArrayList bin = new ArrayList();
    // ParseTrash still works, without changes:
    ParseTrash.fillBin("VTrash.dat", bin);
    // You could even iterate through
    // a list of visitors!
    PriceVisitor pv = new PriceVisitor();
    WeightVisitor wv = new WeightVisitor();
    Iterator it = bin.iterator();
    while(it.hasNext()) {
      Visitable v = (Visitable)it.next();
      v.accept(pv);
      v.accept(wv);
    }
    pv.total();
    wv.total();
  }
} ///:~
Note that the shape of
main( ) has changed again. Now there’s only a single
Trash bin. The two Visitor objects are accepted into every element
in the sequence, and they perform their operations. The visitors keep their own
internal data to tally the total weights and prices.
Finally, there’s no run-time type
identification other than the inevitable cast to Trash when pulling
things out of the sequence. This, too, could be eliminated with the
implementation of parameterized types in Java.
One way you can distinguish this solution
from the double dispatching solution described previously is to note that, in
the double dispatching solution, only one of the overloaded methods,
add( ), was overridden when each subclass was created, while here
each one of the overloaded visit( ) methods is overridden in
every subclass of Visitor.
There’s a lot more code here, and
there’s definite coupling between the Trash hierarchy and the
Visitor hierarchy. However, there’s also high cohesion within the
respective sets of classes: they each do only one thing (Trash describes
Trash, while Visitor describes actions performed on Trash), which
is an indicator of a good design. Of course, in this case it works well only if
you’re adding new Visitors, but it gets in the way when you add new
types of Trash.
Low coupling between classes and high
cohesion within a class is definitely an important design goal. Applied
mindlessly, though, it can prevent you from achieving a more elegant design. It
seems that some classes inevitably have a certain intimacy with each other.
These often occur in pairs that could perhaps be called
couplets, for example, collections and iterators.
The Trash-Visitor pair above appears to be another such
couplet.
Various designs in this chapter attempt
to remove RTTI, which might give you the impression that it’s
“considered harmful” (the condemnation used for poor, ill-fated
goto, which was thus never put into Java). This isn’t true; it is
the misuse of RTTI that is the problem. The
reason our designs removed RTTI is because the misapplication of that feature
prevented extensibility, while the stated goal was to be
able to add a new type to the system with as little impact on surrounding code
as possible. Since RTTI is often misused by having it look for every single type
in your system, it causes code to be non-extensible: when you add a new type,
you have to go hunting for all the code in which RTTI is used, and if you miss
any you won’t get help from the compiler.
However, RTTI doesn’t automatically
create non-extensible code. Let’s revisit the trash recycler once more.
This time, a new tool will be introduced, which I call a TypeMap. It
contains a HashMap that holds ArrayLists, but the interface is
simple: you can add( ) a new object, and you can get( )
a ArrayList containing all the objects of a particular type. The keys for
the contained HashMap are the types in the associated ArrayList.
The beauty of this design (suggested by Larry O’Brien) is that the
TypeMap dynamically adds a new pair whenever it encounters a new type, so
whenever you add a new type to the system (even if you add the new type at
run-time), it adapts.
Our example will again build on the
structure of the Trash types in package c16.Trash (and the
Trash.dat file used there can be used here without
change):
//: c16:dynatrash:DynaTrash.java
// Using a HashMap of ArrayLists and RTTI
// to automatically sort trash into
// vectors. This solution, despite the
// use of RTTI, is extensible.
package c16.dynatrash;
import c16.trash.*;
import java.util.*;

// Generic TypeMap works in any situation:
class TypeMap {
  private HashMap t = new HashMap();
  public void add(Object o) {
    Class type = o.getClass();
    if(t.containsKey(type))
      ((ArrayList)t.get(type)).add(o);
    else {
      ArrayList v = new ArrayList();
      v.add(o);
      t.put(type,v);
    }
  }
  public ArrayList get(Class type) {
    return (ArrayList)t.get(type);
  }
  public Iterator keys() {
    return t.keySet().iterator();
  }
}

// Adapter class to allow
// callbacks from ParseTrash.fillBin():
class TypeMapAdapter implements Fillable {
  TypeMap map;
  public TypeMapAdapter(TypeMap tm) { map = tm; }
  public void addTrash(Trash t) { map.add(t); }
}

public class DynaTrash {
  public static void main(String[] args) {
    TypeMap bin = new TypeMap();
    ParseTrash.fillBin("Trash.dat",
      new TypeMapAdapter(bin));
    Iterator keys = bin.keys();
    while(keys.hasNext())
      Trash.sumValue(
        bin.get((Class)keys.next()));
  }
} ///:~
Although powerful, the definition for
TypeMap is simple. It contains a HashMap, and the
add( ) method does most of the work. When you add( ) a
new object, the handle for the Class object for that type is extracted.
This is used as a key to determine whether a ArrayList holding objects of
that type is already present in the HashMap. If so, that ArrayList
is extracted and the object is added to the ArrayList. If not, the
Class object and a new ArrayList are added as a key-value
pair.
You can get an Iterator of all the
Class objects from keys( ), and use each Class object
to fetch the corresponding ArrayList with get( ). And
that’s all there is to it.
The filler( ) method is
interesting because it takes advantage of the design of
ParseTrash.fillBin( ), which doesn’t just try to fill a
ArrayList but instead anything that implements the Fillable
interface with its addTrash( ) method. All filler( )
needs to do is to return a handle to an interface that implements
Fillable, and then this handle can be used as an argument to
fillBin( ) like this:
ParseTrash.fillBin("Trash.dat", bin.filler());To produce this handle, an
anonymous
inner class (described in Chapter 7) is used. You never need a named class
to implement Fillable, you just need a handle to an object of that class,
thus this is an appropriate use of anonymous inner classes.
An interesting thing about this design is
that even though it wasn’t created to handle the sorting,
fillBin( ) is performing a sort every time it inserts a Trash
object into bin.
Much of class DynaTrash should be
familiar from the previous examples. This time, instead of placing the new
Trash objects into a bin of type ArrayList, the bin
is of type TypeMap, so when the trash is thrown into bin
it’s immediately sorted by TypeMap’s internal sorting
mechanism. Stepping through the TypeMap and operating on each individual
ArrayList becomes a simple matter:
    Iterator keys = bin.keys();
    while(keys.hasNext())
      Trash.sumValue(
        bin.get((Class)keys.next()));
As you can see, adding a new type to the
system won’t affect this code at all, nor the code in TypeMap. This
is certainly the smallest solution to the problem, and arguably the most elegant
as well. It does rely heavily on RTTI, but notice that each key-value pair in
the HashMap is looking for only one type. In addition, there’s no
way you can “forget” to add the proper code to this system when you
add a new type, since there isn’t any code you need to
add.
Coming up with a design such as
TrashVisitor.java that contains a larger amount of code than the earlier
designs can seem at first to be counterproductive. It pays to notice what
you’re trying to accomplish with various designs. Design patterns in
general strive to separate the things that change from the things that stay
the same. The “things that change” can refer to many different
kinds of changes. Perhaps the change occurs because the program is placed into a
new environment or because something in the current environment changes (this
could be: “The user wants to add a new shape to the diagram currently on
the screen”). Or, as in this case, the change could be the evolution of
the code body. While previous versions of the trash-sorting example emphasized
the addition of new types of Trash to the system,
TrashVisitor.java allows you to easily add new functionality
without disturbing the Trash hierarchy. There’s more code in
TrashVisitor.java, but adding new functionality to Visitor is
cheap. If this is something that happens a lot, then it’s worth the extra
effort and code to make it happen more easily.
The discovery of the
vector of change is no trivial matter; it’s not
something that an analyst can usually detect before the program sees its initial
design. The necessary information will probably not appear until later phases in
the project: sometimes only at the design or implementation phases do you
discover a deeper or more subtle need in your system. In the case of adding new
types (which was the focus of most of the “recycle” examples) you
might realize that you need a particular inheritance hierarchy only when you are
in the maintenance phase and you begin extending the system!
One of the most important things that
you’ll learn by studying design patterns seems to be an about-face from
what has been promoted so far in this book. That is: “OOP is all about
polymorphism.” This statement can produce the “two-year-old with a
hammer” syndrome (everything looks like a nail). Put another way,
it’s hard enough to “get” polymorphism, and once you do, you
try to cast all your designs into that one particular mold.
What design patterns say is that OOP
isn’t just about polymorphism. It’s about “separating the
things that change from the things that stay the same.”
Polymorphism is an especially important way to do this,
and it turns out to be helpful if the programming language directly supports
polymorphism (so you don’t have to wire it in yourself, which would tend
to make it prohibitively expensive). But design patterns in general show
other ways to accomplish the basic goal, and once your eyes have been
opened to this you will begin to search for more creative
designs.
Since the Design Patterns book
came out and made such an impact, people have been searching for other patterns.
You can expect to see more of these appear as time goes on. Here are some sites
recommended by Jim Coplien, of C++ fame (http://www.bell-labs.com/~cope),
who is one of the main proponents of the patterns movement:
http://st-www.cs.uiuc.edu/users/patterns
http://c2.com/cgi/wiki
http://c2.com/ppr
http://www.bell-labs.com/people/cope/Patterns/Process/index.html
http://www.bell-labs.com/cgi-user/OrgPatterns/OrgPatterns
http://st-www.cs.uiuc.edu/cgi-bin/wikic/wikic
http://www.cs.wustl.edu/~schmidt/patterns.html
http://www.espinc.com/patterns/overview.html
Also note there has been a yearly
conference on design patterns, called PLOP, that produces a published
proceedings, the third of which came out in late 1997 (all published by
Addison-Wesley).
[67]
But be warned: the examples are in C++.
[68]
In the Python language, all functions are already objects and so the
Command pattern is often redundant.
[69]
Page 235
[70]
Addison-Wesley, 1999.